
If it’s one thing that cars from the late ‘70s and early 80s had it spades, it was anemia. No matter how many gaudy decals, flares or other overwrought “appearance packages” they had stuck on them, there was little that could change what was stuck IN the cars of the time. Of course, what was there, almost inevitably, was some kind of emissions-controls-choked, wheezing, low-compression ghost of a previous engine. Thus it was with the Volare.
The Road Runner had once been a force to be reckoned with. Back in the days of 440-six packs and other great Mopar mills (like the 340), Road Runners were fearsome street machines. However, by the time the last of the Volares, in the guise or Road Runners, rolled around, things had changed. Gone were fire-breathing Hemis and the distinctive “Mopar lifter clank” that made the cars of yore so exciting. Instead, what a customer got was a 318.
Now, don’t get me wrong, the 318 CAN be a good engine. There’s plenty that can be done to shake them out of their emissions comas and bring them back to life. Like Ford’s 302 and Chevy’s 305, the 318 is technically a good motor; it has good genes. They just need to be “reactivated”. However, that wasn’t something that car companies or dealers could really do in 1980. There was no way to sell a souped-up version, because it wouldn’t meet CAFE and emissions standards.
So, if you ordered a Road Runner in 1980, you got a car that was basically the mechanical expression of automotive surrender. Chrysler understood that the glory days were over. It’s like they really phoned in the last of the Road Runners. Gone were cheeky cartoon mascots and cute dust-trail decals. Gone were the various stripes and bold engine callouts. Instead, owners got three bare-bones decals calling out their car as a Road Runner, blacked out chrome and body-coloured mirrors. That was all there was for appearance changes from a normal Volare. However, Chrysler’s apathy didn’t end there.
Laboriously wheezing under the hood, like a groundskeeper with allergies at the height of ragweed season, lurked one of the more reviled engines of all time: the Lean Burn 318. While Pontiac was busy using turbocharging to give their small 301 V8 at least credible performance, Road Runners had to make do with this barely-serviceable travesty of a mill. It was a gutless wonder right out of the box, and it really didn’t serve the car well at all. Properly equipped and coloured, even the last Road Runners COULD be made to look acceptable, but without aftermarket work, they weren’t going anywhere, and not in anything remotely like a speedy manner.
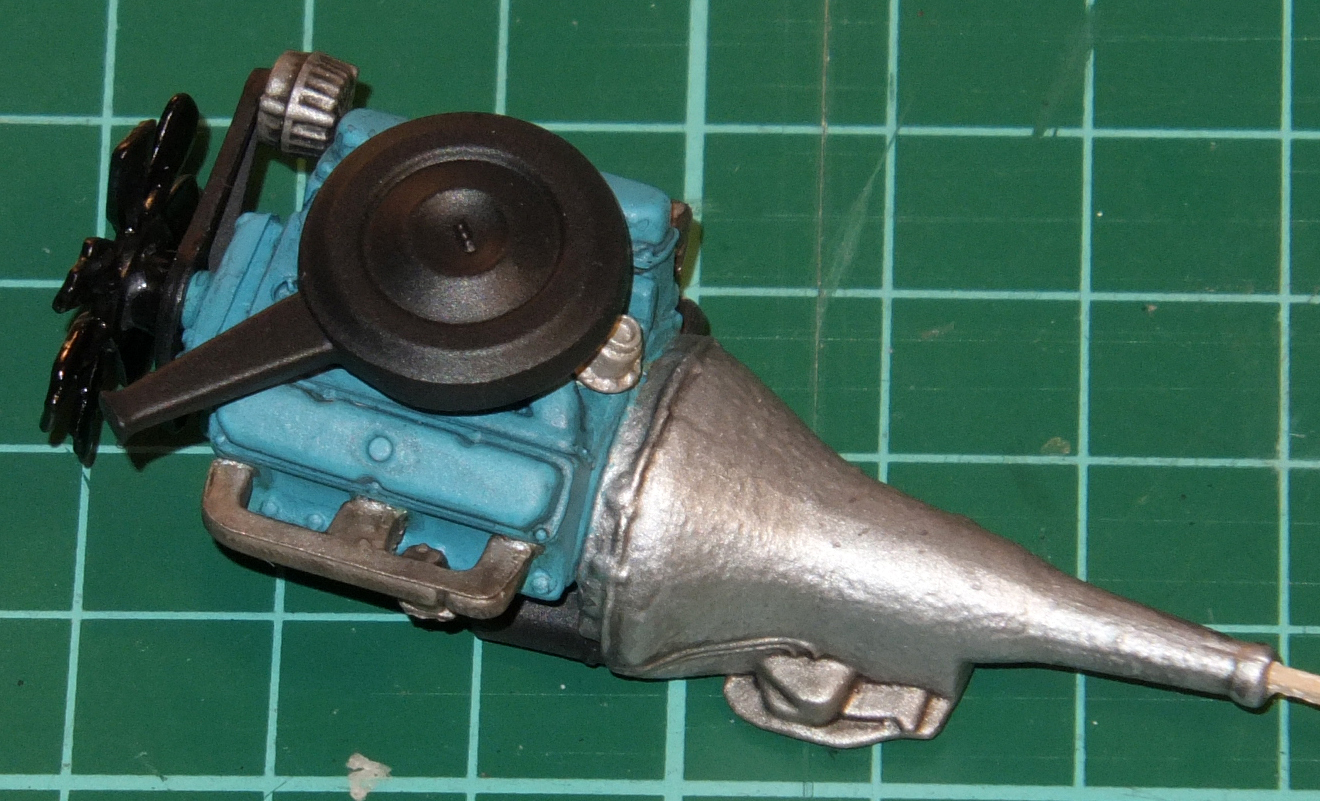
This is the “heart” of the Volare-based Road Runner. Thank goodness that MPC and Round 2 gave us the chance to build this loser mill stock!
That’s why I was very excited to see that Round 2’s Fuzz Duster reissue came not with some lame custom engine that might have actual performance. Instead, MPC had foisted off on us, the plastic car owner, a scale replica of the same lustreless, rough-running boat-anchor that Chrysler heaped onto the car buying public! I was very excited to build my own monument to one of the saddest participants/victims of the Automotive Dark Ages, and so I started to work on the Fuzz Duster’s engine and chassis first!
(Lean) Burn On!
As is normal for MPC car kits, the engine itself, regardless of what it is a replica, is a very nice piece of sprue. There are separate cylinder banks to glue on, and there are numerous separate-piece accessories, including starter, oil filter, fan belt, fan and alternator. The fuel pump (I think) is moulded on an arm that is part of the engine face, and there is also a separate distributor cap. All of the pieces are quite “flashy” and require considerable clean-up before use.
Oddly, while the stock carburettor and air cleaner/intake are moulded in white, like the rest of the kit, the intake manifold is chromed. Same with the valve covers and alternator. These had to be stripped first, of course, since there is ZERO chrome on this engine stock. There’s also a two-carb custom intake, complete with separate carbs and intake venturis with domed covers. However, that’s not something I was interested in, so I gave them to a buddy who needed them.
The engine went together beautifully and needed only light sanding on the transmission housing. I painted the air cleaner, starter and what I think is the oil filter Testors Model Master Acrylic (MMA) Aircraft Interior Black (AIB). I used the same colour for the fan belt and fan, although I glossed the fan and pulleys for contrast. I used MMA Steel to paint the fuel pump, Transmission pan, alternator and distributor. The transmission housing was done in MMA Aluminum for contrast with the pan. I used the same colour, with a light gold pigment over-wash, for the carb. For the exhaust manifolds, I used MMA Jet Exhaust, to give them a rougher, heat-worn look.
The main block was painted blue, as I’ve seen the 80’s were, indeed, blue. I didn’t have the exact colour, but I found a train colour that worked almost perfectly: Polyscale St. Lawrence Blue acrylic! Once everything was dry, I put it all together (save the fan and belts) and gave the entire engine a very, very diluted wash of Citadel Nuln Oil, just to highlight and add that little bit of depressing griminess for which the engine seemed to cry out. The entire assembly was then given a light coat of Delta Ceramcoat Indoor/Outdoor Matte Urethane Varnish, cut with Future, to lock down and even out the wash and colours, while maintaining a semi-gloss finish.

The fan blades and pulleys are glossy, the rest is semi-gloss. Note the wash just highlighting some of the raised surface detail.
Solid Foundation:
The chassis on the Fuzz Duster isn’t one of MPC’s greatest offerings. I’m sure it hasn’t changed since the ’75 Dart kit, or if it has, it hasn’t done so much. The driveshaft, steering gear and gas tank are all moulded into the chassis, requiring careful painting. The exhaust, or most of it, is moulded onto the rear suspension/axle/differential unit. There’s not front suspension, A-arms or anything beyond a pair of holes for the axles up front.
I painted the chassis with MMA Primer Grey, since I think the chassis might still have been primered on the real cars at this point. That was a bit of a guess, but it adds visual interest, so I was cool with it. I painted the subframe arms AIB, and the driveshaft in MMA Steel. I had to paint grey primer partway up the side of the driveshaft so it would look ‘disconnected’ from the underbody pan. I think I was successful on this. I painted the front steering gear the same way, and both got a very light wash of Nuln Oil, to add texture to the “metal”.
The “pumpkin” was painted MMA Virsago Black (a mix of black and dark grey), with the springs and exhaust pipes in Steel and the actual resonator/final pipe segment in Jet Exhaust. I had to drill out the actual exhaust hole with a pin-vise; otherwise, the pipe would have had a flat face, ant that just looks wrong. I did the gas tank in MMA Aluminum, and it too got a light wash.

There’s not a lot to the chassis, but it gets the point across. The steering linkages and drive shaft being moulded-in is a pain to paint around! Note the drilled out, single, exhaust pipe!
The engine bay was had painted using MMA Gloss Black. I am doing the whole car in black, so this seemed logical. I used some steel and matte AIB to mark in various details on the fender wells. The “wall” holding radiator was also done in gloss black, but the rad and shroud were done in matte AIB. The shroud was then given a light coat of what I call “Hand Vinyl”; it’s a semi-gloss varnish that seeps into matte paint to give it a bit of a shine. This is perfect for simulating the greasy shine of both vinyl and plastics in cars.
The engine was then glued in place, and fit quite well. It did seem to want to tip over on one side, though, so I had to use a spot of CA to glue and hold the motor, while conventional Plast-i-Weld glue was applied for the long-haul holding. To my surprise, the engine mated up to the driveshaft almost perfectly. It would have been better had there been a location pin for assistance, though. With the engine down, the radiator support wall was glued in place, as was the rear suspension. This fit REMARKABLY well, the ‘half U-joint’ on the differential fitting right around the end of the driveshaft.
The only iffy part was the chunk of exhaust connecting the manifolds to the main, none-too-beefy main exhaust line. There was, of course, no positive location, so it took some finagling. Still, after a bit of “pin he pipe on the wheezer”, the pipes were mated and all was done. Well, almost all. The battery, painted black, was installed on the appropriate shelf on the driver’s side of the fan shroud, while two small jugs also had to be added. They were sprayed with “Paint It” white rattlecan paint, and then “vinylized”. I then used clear green and clear blue to paint on some anti-freeze and washer fluid (respectively) on the outside of the jar. These paints are so thin that they don’t cover perfectly, and they do give the impression of a bit of colour coming through those milky-white jugs.

A rad hose that fits! AMAZING! It can be hard to see, but there is blue and green “liquid” in the two tanks. There’s very little support or location for the engine, and it tends to ‘tip’ to one side during installation.
I was astounded to see that the rad hose even fit perfectly! I painted the entire “top” of the chassis in AIB, in case anyone could see in once the model was done.
Sit Down, Shut Up and See Red!
While the performance of Dark Ages “muscle cars” is always, and rightfully, in question, one thing that they did have going for them was cool interiors, at least by and large. Unlike today where you get a choice of either grey, black or sometimes tan, there were a lot of options in the time of this final Road Runner. You could get black, blue, red, grey and likely a few other colours, maybe even green. Coloured interiors are one of the things I miss most about modern cars, as they really add to the overall effect, I find.
A lot of times you would order an interior to match the car. However, you could always go the other way, too, and get something that contrasted. That was often the case with red interiors. As you can see from Faust, having a red interior on a red-accented, black-painted car is really very, very striking. It’s always been that way, and I can’t see it ever changing. Even on something as pedestrian as one of these Volare Road Runners, putting a red interior in a black car was a sure-fire way to make it look WAAAY hotter and meaner than it actually was!
I found a perfectly restored (I assume, but it could be original, maybe?) Volare Runner for sale on the internet, and it was black with the red interior. I will say it was breathtaking; to apply that term to one of these square and sudsless shadows of a performance car tells you just how good it must look. Since the “Road Runner” decals that come with the model are in the red spectrum, I decided to duplicate this real car in kit form, down to the red interior.

This is the interior of the Fuzz Duster, in red just like they show it on the box. Hopefully, mine has turned out a bit better.
The interior in the Volare kit is very simple. You get a bucket, two halved (and badly-fitting, as always) front seats, a dashboard, steering wheel and a gear shift lever. Not really very exciting, or is it? The dash has pretty good detail on it, although the transitions from the main dash face to the embedded controls/dials is a bit soft. The seats sand nicely and have good vinyl-like texturing on them. Of course, the carpet is typical MPC, meaning it has good texturing and horribly inconveniently placed injection pin marks.
I primed the entire bucket in grey primer and then applied an orange-red colour that I generally use as a “backing colour” for red. The interior, all of it, was then painted with Model Master Acrylic (MMA) Guards Red. This is a very bright red, and matched the decals pretty well. I then glossed the entire interior and the seats/dashboard with Future. To this I applied some ground up chalk pastel that I’d mixed to a reddish brown. I washed this into place using Varsol. The resulting slurry filled in the pattern marks on the seats and door panels nicely and subtly. I did this a couple of times, with Futuring between each application of pastels, to build up the shadows in the vinyl.
I then flat coated the entire bucket so I could apply the same dark pastel to the carpet to give it a change of colour and a look of shadows in the nap. It was a tiny bit too much in a couple of places, but overall it looked pretty good. I nailed it down with Delta Ceramcoat Indoor/Outdoor Matte Urethane Varnish, and left the carpet. It didn’t have as much nap as in Gold Rush, so I didn’t do the pencil crayon highlighting like I did on the van.
To make the vinyl look “sweaty” as a lot of vinyl in those days did, I applied a concoction I call “Hand Vinyl” to the door panels, seats and centre console. This mixed semi-gloss clear coat is made of a bit of Future, some Delta Ceramcoat Indoor/Outdoor Matte Urethane Varnish and some water. It dries a bit “greasy” in terms of shine, and over matte coat, two hand-brushed coats of this will give that sickly vinyl shine. Note that I did not use any pastel on the parcel shelf. I left it alone, since I wasn’t sure how ‘carpeted’ it was, and it had no real texture to it. It remained matte, so it would look like fine felt or cardboard.

Wow, that’s red! YOu can see the matte carpet and parcel shelf along with the “sweaty” vinyl. the change in reflectivity adds a lot of texture to what is essentially one big red blob!
The dashboard in the Volare Runners was a horribly sad attempt to be like a Trans Am. Whereas Faust and his ilk have the very stylish engine-turned “disco dash”, the Volare Runners use a simple silver faceplate. It has none of the character, kitch factor or even style of the T/A’s dash, but then again, that makes it fit perfectly with the “pretender” nature of the whole car. I used Model Master Chrome Silver oil paint for this, and then marked in all the dash controls and dials in black. I picked out the speedometer detail with a silver pencil crayon, as I did for other controls.

Wow. Really? Chrysler’s lame attempt to “borrow” style from Trans Ams is both sad and brutally evident, as you can see here.
The dash was given a flat coat and then “hand vinyled” to the correct sheen. The interior went together well and with small details like window cranks and pull-strap holders picked out in silver, it looks quite respectable.
The only problem is: It’s wrong. This is a 77/78 interior at least (maybe it’s even the ’75, I can’t be sure). It doesn’t match the car on the internet, and I doubt he spent all that time and trouble to put the car back with the wrong interior. Everything is wrong in the bucket, from the door panel design to the seat pattern and shape. Still, when it’s all done, unless you know your Volares, you won’t notice. This is just another case of MPC making as few changes as possible to keep costs down. You know, since it gave me the chance to build the ’80 Volare Runner, I’ll take it!

It may not be technically correct, but it still looks good from here, and that’s all you really need for the interior anyway!
Conclusions:
Sure, this isn’t the best chassis from MPC, but the motor is nice, with good details and textures. The interior may not be correct either, but it went together well, has similarly nice detail and textures. So far, the Fuzz Duster is looking pretty good; I hope the rest of the kit goes this smoothly!
Overall, I’m impressed with the quality of the pieces and restoration of the moulds that Round 2 has done for this kit. I think it’s definitely the better for it!

We’re living in an automotive renaissance! Even the cartoon mascots are back, bring on the the Challenger Demon!
Just earlier today I was remembering how when I was a kid the cars were so terrible, and everyone just talked about the OLD cars you could find. It was a few years after I learned to drive when things started getting interesting again with new Mustang, Cameros, Firebirds and Corvettes. Thanks for the nostalgia!
Lol! I agree!
I’m glad you like what I’m doing, and as for nostalgia, you’re very welcome. There will be more, I guarantee it!
Nicely done Adam! I too have an OLD Volare “Promo” that I plan to make like the one my Grandfather had….. Rode in that car a lot as a kid….. I plan to cut the hood open and add the Slant 6 into it. As well as add “true” front suspension! -A ways off tho. the one I’m doing is a ’77, the Fuzz Duster is said to be an ’80 if I remember correctly!
Just as a thought, you might still be able to find the ’77 kit somewhere. It might make your life a LOT easier. Or, you could take a Fuzz Duster and use the chassis and engine and just cut the hood out of the promo. I imagine the body will fit right on, since I think the chassis is the same on both, just screwed on in the promo.
Just some ideas, but whatever you do, it sounds like it’s going to be cool! They don’t make kits of many of the cars I grew up in. The Starsky Torino is the only close one; my dad has a ’76 Torino with the Special Value package. Nice looking car, but hot as hell in the summer! Ahh, burning flesh on vinyl!
Fuzz Duster is an 80, yeah. Last of the line!