

Emerging from the mists of the past (and the bongs?) comes the SUNDANCE EXPRESS! Does that set the mood or what?
Dude, dude, dude… remember back in the day, like way back, when there was, like, all these vans and stuff rolling around? Remember? Dude, dude, focus: think about them! They had these awesome opera windows, and fin-mags, and white exhaust pipes and they were covered in, like, murals of like naked chicks riding polar bears through space deserts on pirate ships with vikings and stuff?? Remember they had like shag carpet and TVs and wood panelling and mirrors and crushed velvet and stuff in them? They were totally like… dude, dude, pass the Doritos… what was I saying?
Well, that may not be EXACTLY how it happened, but if you remember the ’70s and early ’80s, then chances are you saw your fill of street vans. These were rolling, customized bordellos that always seemed to have a theme. Whether it was a space theme, or wizards, or naked chicks on polar bears (yeah, I actually did see several with that theme), there was always some kind of crazy paint work and muralization that accompanied these rolling canvases. Inside was just as freaky, with chandeliers, wood panelling, lots of shag carpet or crushed velvet (or both!?). Captain’s chairs and beds, tables and even minibars were not to be missed!
I remember seeing these things at the Autorama custom car show in London, Ontario, back when I was a wee lad. They were pretty neat then; now that I can appreciate them for just how much work they represent, I think they’re AWESOME now. It also helps that they are now very rare and by definition can’t be taken seriously.
Since I started building cars, I’ve wanted to try to recreate one of these things. Thanks to Revell putting out this (umpteenth) reboxing of their Street Van kit, I got the chance. When I picked this up, I was overjoyed; this was before the new Vantasy and Phantom van repops came out, and it was the only street van to be had.
For a while this was the most obtainable Street Van you could get. It’s also one of the finest!
The Kit:
Given that this kit has been around a while, it is actually a very good fit for the most part. It is far better than the more recent “Vantasy” kit on all levels. Unlike Vantasy and Phantom, this van has a full interior with removable roof! That means that the scale vanner in you can go as crazy as you’d like. There’s already some interesting stuff in there, including the de rigueur buttoned leather (likely naugahyde, given the era!) walls, small TV, bar fridge, CB and wood-panelled upper walls! Yes, ladies and gentlemen, it IS just like a rolling rec room!
There is a very generic V8 engine with only a bit of detail, but it does’t matter because the point of this kit isn’t the motor. it’s the paint, decals and insides that count!
Vannin it up!
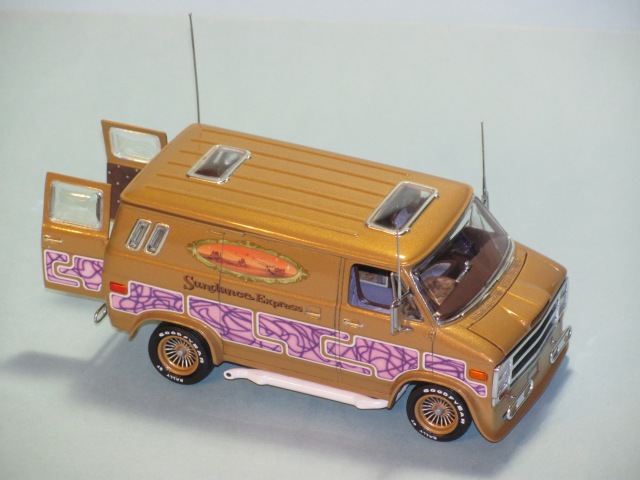
The hardest part on this kit is chosing a theme and appropriate colour scheme. I liked the “Sundance Express” writing that clearly went with the stagecoach mural, so that’s how the van ended up. With this in mind, then, it seemed that a western-themed van was appropriate. (Well, okay, “appropriate” is maybe not the best word here…) however, since old vans were known to be loud and wild, I thought that maybe the pinkish panelling would work well too. Kind of like a sunset, I thought. Well, not quite, as it turned out, but it did work regardless!

This is a good view of the “western” mural. I would have preferred orange panel decals, but the mavue adds an over-the-top clash you just can’t get with complimentary colours!
To go with the mural, I decided to paint the van in metalflake gold. I made this paint out of Future, a bit of Testors Model Master Acrylic Dark Tan and lots of different Jaquard pigments. These things are awesome, and Michaels’ (an arts/crafts store, invaluable to modellers, and similar in many ways to Hobby Lobby) carries them. I used several different shades of gold and a bit of copper, which in retrospect I shouldn’t have. The copper is too dark and red, but there’s not much of it, so it wasn’t a deal breaker.
I decided to have the carpet match the side panels, so painted it a dusty lavender colour. I mixed up a darker version of this colour out of chalk pastel, and then used it to pick out the lines in the buttoned seats as well as the nap of the carpet. I rubbed in the pastel over the glossed carpet, and then blew it off. It stuck in the recesses, giving the impression of shadow. I then re-glossed it to nail it down, and then flatted it, since even in the 1970’s, I don’t think they had shiny carpet. At least I hope not.

Here you can see the mauve/lavender rug (with texturing highlighted) and the studded naugahyde door/wall coverings. YIKES! Note the dark lines between studs, also done with pastels!
I did the naugahyde in dark brown (growing up, we had a La-Z Boy that colour!) and did the seams where the buttons pulled it in in a darker brown, to simulate shadows. It only seemed right that the pillows in the ‘bed’ area be of the same tacky material, so they were browned too. The big part was the wood grain. There is some grain moulded in, but it’s too subtle to pick out, even with a wash. To get a wood effect, I first brushed the wood a very light yellowy-beige. I then used a small brush with some MMA brown on it to dry brush on some grain, and then went over it with a Citadel “Devlan Mud” wash. This unified things very well, making the yellowish more gold, and really giving you that “fake wood” feeling!

Check out the woodgrained walls in this shot. Home sweet home! P.S. Nice CB aerial there!

The wood continues in the cabin with cup holders nad the dashboard, not to mention the overhead panel! Nice TV fridge combo!
I repeated this on the cup holders and dashboard, as well as the overhead console and fridge door. With all this done, there was still something missing. It took me a bit to figure it out, but then I realized it: a disco ball! Going to Hobby Lobby, I found some glass beads that were the right size and shape. Using the Alclad Chrome paint, I mirrored one and voila! To attach it, I made my own cross frame out of sheet styrene, woodgrained it and drilled a tiny hole in it. I used the clear plastic line the beads came on to hang the ball, and when all was said and done, my van was ready to get down! As a note, the roof will fit on with the disco ball in there; it is glued in and there’s no getting it out of there!

Saturday night’s alright for DANCING! This disco ball sets the mood and keeps things rockin’ in the bed area. Not a place a lot of dads likely wanted to think about back in the day! The support frame was custom-made out of sheet styrene.
I also used the Alclad Chrome on the frame and grille, as well as the bumper bits and some engine parts. That stuff is awesome! So long as you use their shiny black primer, you’re good to go. Just be sure to a.) use a think coat of chrome (very important) and b.) don’t handle it too much; it’s fragile! The wheels that come with the kit are some kind of mag and are really uninspiring. However, I found that the custom wheels from the old Monogram ’53 Chevy worked out just fine. I panted them gold, and then did the spokes in silver to make them stand out.
I seem to remember a lot of white exhaust pipes from my youth, so that’s how I did the pipes on this van as well. It’s a bit kitschy, but really, what on this thing isn’t? I used Bare Metal Foil for the trim on the windows, opera windows and sunroof/skylights. The tires were sanded down (removing that awful seam down the middle) and the letters were painted on in Testors MMA white. The tires were then given a ‘shine’ by applying TurtleWax Ice Liquid Polish to them, and letting it sink in. This is a very effective method for applying scale tire shine, and it won’t hurt paint!

White pipes and fin mags. What year is this thing from again?
The entire van was Futured multiple times, and sanded down to 12,000 using my Detail Master sanding cloths. I then applied a coat of the Ice Liquid polish to see how it worked, and it came up beautifully.
Final assembly was quite easy, and the body fit on the frame and floor well. The roof is a tiny bit warped, but not bad for such a long, flat piece. I can set it on and the thing looks like a van, so that’s all I really need.
Conclusion:
This van was a blast to build, and really let me cut loose. There’s no real way to ‘overdo’ a van like this, and when I finished this one, I was really looking forward to doing another one. However, THAT is a different article altogether!
Van on, folks, if you can find this one! It’s a great way to just blow off some steam, but just be careful, because I think these things give you the munchies all by themselves! 🙂

Chrome frame, purple engine/pumpkin, white pipes and body-coloured floorpan: this van is DONE UP from top to bottom. Chrome A-Arms tell the world you’re in charge!

This top view shows the twin skylights to good advantage. The disco ball is still in the van under the roof; it all fits!

“… when the mist just starts to clear…” Just like Dio says in Long Live Rock and Roll “…you could never quite be sure…”
I can’t help but wonder what made that smokey fog. Any ideas?

SACLEIELETRCICXS
scalecleletricxs
It was vans and cars from this era that really got me into cars. I remember being about 5 and visiting my uncle and having to hide somewhere to read his Custom Car(UK) and Street Machine(UK) magazines. Seems my mum didn’t want me looking at the nekid women but i was genuinely looking at the vehicles. Thanktoy for showing your wonderful models and bringing back some memories for me. Can’t beat nostalgia, its not just for hot rods
Hey Leslie!
Glad you enjoy the site, and the cars! It always makes me feel good when someone else gets a burst of nostalgia from this stuff.
I used to go to custom car shows in the summers with my dad and uncle, and they were always lots of fun. I also remember going to see mall displays of the new cars they’d sometimes have.
Hotrods are cool, for sure, but there were all kinds of cars around, and that’s what I like to portray!
Thanks for the comments!