

Ho, ho, ho! Christmas cheer Sprue Lagoon style!
A little while ago, at work, my colleague and I were discussing Christmas Villages. You know the kind; they are for sale in every Michael’s, Hobby Lobby and Canadian Tire starting in mid-October. He knew I was a modeller, and asked if I had one, or what I thought of them. I told him that I didn’t have one, but if I did, I’d want one in scale to my Gundams, so I could have MSs stomping through the Christmas village. Inevitably, one thing lead to another, and before I knew it, an idea was born: If I can’t bring the MSs to the Christmas village, I can bring Christmas to the MSs!
So, thanks to Baumer (my colleague) I went home and began searching for something Christmassy… something like a Gundam I could make into a Santa Claus. I mean, nothing says love and peace like a 50 foot tall bipedal weapon dressed like everyone’s favourite yuletide elf, right? I didn’t want to use a kit that was too flashy, and the layout had to lend itself to having the colours redone like Santa’s suit. Then I found one; the old HG RX-79G Gundam from way back when 8th MS Team first came out. I got it as a birthday present from a friend (Thanks, Sarah!) and it seemed like the perfect way to make use of it!
The Kit:
The old HG RX-79G is a good, if basic, kit. It fits well and comes with a lot of extra weapons, at least in the guise I got it, as part of a two-pack with a Zaku II. It is a simple enough kit to build and final assembly was no big deal, except for the legs, which were all build-around. However, I figured out an ingenious way around that problem! I cut the bottom of the inter-leg joint out, so it could slide over the polycap in the lower leg, and I built the upper leg such that I could just “pop” it around the interleg joint. To do this effectivley, I etched a seam along the vertical axis of the upper leg; essentially adding my own “cheater” panel line, that made sanding this part unnecessary!

This is the weak link; the left shows the original part, the right my modified version, of the inter-leg joint. The cutout allows the piece to be slid over the lower leg’s polycap and post.
The rest of the kit went together without issue and didn’t require any modifications to ease problems with painting and assembly. Given the age of the kit, I was amazed at how good it was, yet I was reminded just how far we’ve come, and how much we now take for granted in the HGUC series.
Getting My Santa On:
Figuring out that the bulk of the mech would be red was the easy part.
I decided that the feet and ankle armour would be black to represent Santa’s boots. Now, looking at it, I wonder if I should have extended the black further up, to the bottom of the knee armour. Regardless, I figure you can think of it as Santa’s pants coming down over the boot to prevent snow from coming in. I used a mix of Model Master Acrylic Gunship Grey and Flat Black to make the blackish-grey colour of the boots. I also used this colour for his belt.

From the front, the white trim and black boots help offset the massive redness of the Santa Suit’s paint.
Since Santa’s coat is traditionally trimmed in white fur, I figured that meant the cuffs, collar and waist would be white. However, that didn’t work, at least for the waist. That put the bottom of the coat too high. I mean, I don’t want it to look like he’s wearing a bolero! So, I extended the coat past his waist, which is more like what we normally think of. However, there wasn’t any demarcation for any white trim at the bottom of theskirt armour! So, I got creative and etched some lines in to show this division, and painted above it red, and below it white. I think it works pretty well! I used MM Acrylic Guards Red for the coat and pants on the Suit, and Tamiya XF-2 Flat White for the trim.
I did the hand armour in green, since some depictions of Santa show him with green mitts. I left the fingers grey, though, since they’d be mechanical and dirty anyway. On the other hand, I wanted things like the vents, tie-down rails on the shoulders, and knee spikes to be brass. This was done with MM Acrylic Brass, and then brownwashed with Devlin Brown (from Citidel) to make it really stand out. There are two little plates in the waist that were also given this treatment, in order to simulate a belt buckle. Normally on a Gundam, that’s the cockpit door, but not on the RX-79.
You can really see the effect of the white trim on the bottom of the Santa Suit’s “overcoat” as well as the brass “belt buckle” and other details.
The head was painted to resemble Santa’s hat. I used the head comb to represent the floppy part of the “santa cap” and painted the rim on the rear sight white to be like the pom-pom on the end of it. The sides of the head were done in white to simulate both the fur on the hat and Santa’s white hair. To complete the illusion, I did the faceplate in flesh colour and the “chin” piece in white, like a little beard!
The biggest question was “what would a Santa Gundam” be carrying? Clearly, it would be some kind of pack. Luckily, the RX-79 comes with a big backpack! Unfortunatley, this is utterly unsuitable for the job. SANTA DOESN’T CARRY A BACKPACK! However, he does carry a sack, so that made things a bit more difficult. Still this is a Special Project, so I had to make a bag!
To do this, I took some Terracotta Crayola model Magic and rolled it as thinly as I could through a pasta roller. I then rolled it one more time at the thinnest setting while it was on top of a fine mesh sheet. this imprinted a pattern on the one side of the Model Magic. To get a sack shape, but not make it too heavy, I got a ping-pong ball and moulded the Model Magic around it, with the pattern facing out. I then cinched the top, and tied it with string. It looked like a heavy canvas bag, but the colours were all wrong.

Ping pong ball and Model Magic, before the work begins…

here’s the pasta roller with the Model Magic flattened as much as I can get it.

This is the fine mesh I used to texture the sack’s outside. Note the (long) string used to tie up the Model Magic around the ping pong ball.
When it’s dry, you can paint Model Magic, but I decided to try just washing it. I used Badab Black and Devlin Brown washes from Citadel, and when all was done, the end effect looked a lot like very heavy burlap. Perfect! I washed the string the same way, so as to simulate heavy rope.
To mount the bag on the Santa Suit’s back was going to be a bit harder, or so I thought. Thankfully, the “folded up” version of the Gundam’s backpack has two tall “forks” on it, and this was used to guide the string towards a closer-to-center point on the mech. Even luckier was the fact that the RX-79 is designed for air dropping, so it has those big tie-down rails on its shoulders for a parachute pack! I used this as a guide for the bag’s string, and then tied the end around the mech’s hand. When all was said and done, my Santa Suit could sling the pack on his back both convincingly and stably! The lightness of the ping pong ball saved the day, providing bulk for little mass, and preventing the suit from toppling over backwards!

Seen from the side, the burlap-like texture of the sack is apparent. It’s a good thing it’s light!

- This top view shows the threading of the sack’s string; around the backpack fork and through the shoulder hook down to the hand. It’s incredibly secure!
Conclusion:
This was a fun little project that didn’t take long, and it is definitely one of the more original ornaments I have scattered about my house. I liked the idea of doing a Christmas Gundam so much that the idea has now taken hold. I have a few other Christmas themed MS kits now on display as well, and there is a master plan. However, that won’t be done for a bit! 🙂

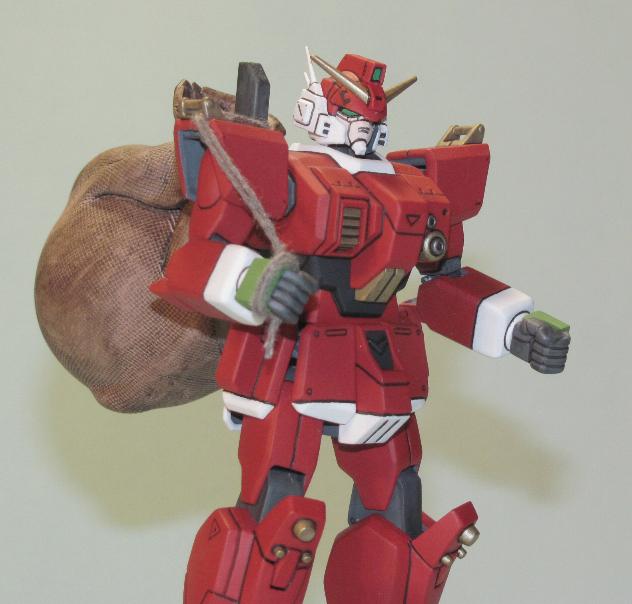
Here’s a back view. the “fur” trim extends around back, and the pack sits nicely on the closed-up backpack unit.

Note the skin-toned face and white beard, as well as the green “mittens” and black “belt” on this upper body view.

[…] imagens usadas neste artigo pertencem ao Adam Rehorn, um gringo aficionado por “Model-Kits”. No blog dele, vocês podem conferir mais fotos desses robôs (e explicações detalhadas sobre o processo de […]
Olá!
Não falo a língua do Brasil, mas usei o Google para me ajudar! Espero que seja aceitável.
Fico feliz que você goste do meu Santa Gundam, e eu acho hilário como você o incorporou no seu RPG! Continue, senhor! Estou muito lisonjeado por essa criação minha ser útil para você, e suas descrições dela me fazem rir! Bom trabalho!
Feliz Natal, para você e todos os seus leitores!
Espere até ver o que tenho na loja para o próximo Natal! 🙂