
Despite the impetus given to aeronautical design and engineering by the Great War, there was a significant amount of stagnation that occurred in the aircraft industry in the decades immediately following the end of that conflict. Nowhere was this largely more obvious that in the development of bomber aircraft. Throughout the ‘20s, the biplane continued to be the preferred configuration for heavy bombardment aircraft, and little thought was given to investing the ponderous beasts with anything approaching refinement.
As the ‘30s began, though, a new age was starting. The monoplane was becoming recognized as a far superior design for aircraft, and by the middle of the decade, the shift towards using monoplane bombers was well underway in most of continental Europe. Many of these early designs, like the Amiot 143, were both visually and aerodynamically ludicrous; with heavily braced wings, draggy engine nacelles and fixed and spatted undercarriage. However, in amongst all these dead-end designs, there was one that looked to be quite ahead of its time.
The plane in question was the Vickers Wellesley. Designed by (later Sir) Barnes Wallis using a novel form of geodetic construction, the Wellesley broke a lot of new ground. Yes, it was covered in fabric along most of its fuselage and wings, but the very strong, light frame was an innovation. In addition, the aircraft had a very slim fuselage and long wings, designed to give excellent range. To help speed and range, the landing gear was retractable, the single engine was tightly cowled, and the two crew cabins were enclosed. Compared to other bombers of the day, the Wellesley looked very futuristic, and offered a new dimension in aerial warfare.
To demonstrate the range potential of their new bomber, the RAF flew a flight of them from Ismalia in Egypt to Darwin, Australia non-stop. This was more than 7000 miles, and took 48 hours. At the time, this was unbelievable. Never mind that the entire aircraft was basically a flying gas tank and that an armed and combat-ready Wellesley would never be able to achieve this; the whole point was to show that the RAF was in the vanguard of aerial bombing, and that no place was outside of its reach.
Unfortunately, the Wellesley was a transitional airframe, and by the time the Second World War broke out, it was severely outclassed and outdated. However, that seems to have been the norm for the early missions in the Middle East and Africa, and the Wellesley saw bitter combat in those locations. Here, its tough design and ability to absorb massive punishment was well-appreciated, and almost made up for its vulnerabilities, slow speed and small bomb load.
The Wellesley is one of those quintessentially British aircraft that one would only expect an English company to kit. In this case, that company was Matchbox. Back in the 80’s, Matchbox issued a kit of the Wellesley Mk. 1. However, when Revell Germany acquired the Matchbox moulds after the latter’s demise, the kit was still issued. This review is of one of those kits, albeit in under the “Matchbox” name.
The Box:
The Revell-Matchbox era boxes are a stylistic outgrowth of the 80’s Matchbox boxes, with their “sunset stripe”. These newer boxes are all black, with fine “laser” versions of the sunset stripes, and an illustration on the box’s front side. Oddly, the illustration is NOT the same as the one on the original box. The “legit” Matchbox boxing shows two aircraft, over a desert background. One is a normal Wellesley Mk. 1, while in the background is one of the record-breaking aircraft, easily distinguished by its more streamlined NACA cowling.
The Revell-Matchbox box shows only a standard Mk.1, but it is cruising over the pyramids at Giza. It’s a nice illustration, and it’s a shame that it doesn’t cover the whole box front. It feels like you’re looking at something widescreen on a 4:3 TV, and that something is missing. The box is, miraculously, a top-opening affair, not one of those oh-so-annoying end-openers that Revell seems to love now. There’s not a lot else on the box, though; there aren’t any pictures of a built kit, and there’s nothing on the back of the box, where a colour painting plan would have been on the original.

Not a bad box, but not as eye grabbing as the Matchbox original. It is a completely new illustration, though! I must say; some of the colours look a bit off.
Overall, the box is not very eye-grabbing, despite the “laser lines”. The other thing that immediately hits you about the box, is that it is TINY. Given the condor-like wingspan of the aircraft, one might expect the box to be rather long, at least. However, that’s not the case. The box is ONLY as long as a single wing from the fuselage outwards. No extra space is provided. This may be one of the most compactly packaged kits I’ve ever seen.
That having been said, I’ve noticed that Matchbox is actually, by and large, one of the most efficient boxers of kits. If you compare Meng’s G91 to Matchbox’s G91Y, the Matchbox is less than half the size! The same goes for many other planes, until you get to the larger subjects. But I digress…
The Kit:
Originally, the Wellesley was moulded in Matchbox’s trademark multi-colour moulding, being available in two colours. I’ve seen one in green and black, and one in green and brown, as well. However, this is a later “Revellbox” kit, so it only comes in one colour, a sand-beige. This is a bit unfortunate from an aesthetic standpoint upon opening the box, but overall it will not be of any consequence to most who have this kit; it will definitely need paint to look even half presentable!
This kit is simple in the extreme. In traditional Matchbox fashion, the interior of the bomber is mostly hollow. The rear gunner/wireless operator’s cabin consists of a plank upon which to place a typical pilot figure, and the pilot’s “front office” is little better. The Pilot does get an instrument panel, with raised detail, as well as a very basic seat and floor, as well as a steering yoke. As expected, there’s nothing on the walls in either cabin, and there’s no floor or anything in the middle part of the plane. This is a shame, because there are a few photos that show what the inside would be like. Of course, this means that any enterprising soul can have a field day scratchbuilding an interior. However, it’s hard to see into the plane anyway, so whether or not this is a worthwhile endeavour is entirely up to the modeller.
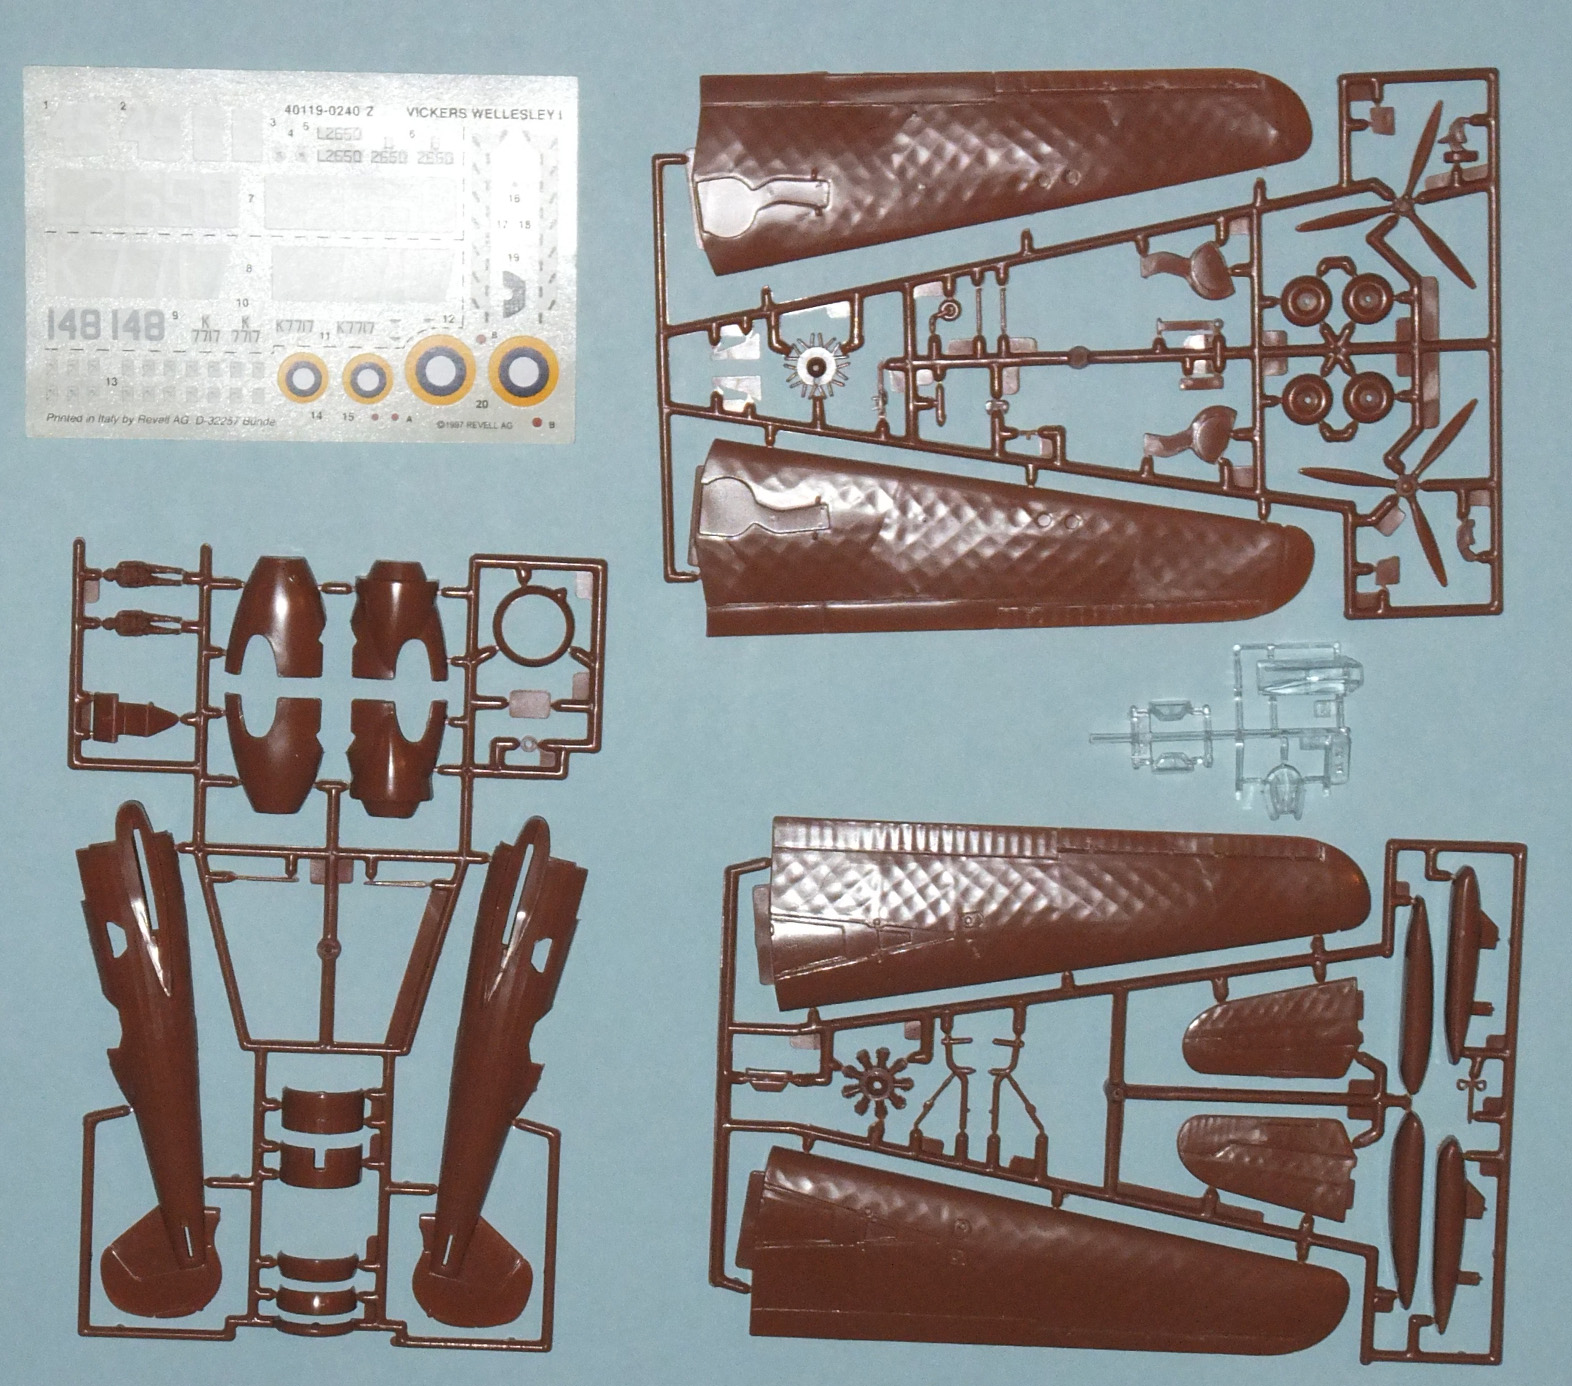
Here’s what you get in the box. The folks at Revell dispensed with the two-colour moulding, which is a bit disappointing. The box is just big enough to hold the sprues.
As expected, the wings come moulded in halves, as does the fuselage. The tailplanes are single pieces but the weapons paniers under the wings come in halves. The Wellesley can be built as either a “standard” combat-type Mk. I with the 930 HP engine, or the record breaking long distance flyer used by the Long Range Development Unit (LRDU) for the flight from Ismalia to Darwin. The latter had a higher horsepower engine, with a more closely-cowled engine and a NACA fairing on the front fuselage. In order to make things simple, Matchbox cast two different noses for the Wellesley, one with the big cowling and one without. The nice thing is that the nose is split right at the spot where the Wellesley changes from fabric covering to metal covering, so the effect of the separate pieces is actually appropriate!
The engine cowlings come in two pieces each, and the front ring is another piece. The engine is moderately detailed, and fits into the cowling on a support pan. The landing gear look to be relatively simple affairs, and there isn’t any detail in the too-shallow wheel bays. It’s not a surprise that Matchbox would be a bit short on the detail in the landing gear department, but it is unfortunate that the wheel bays clearly lack the depth to hold the wheels. The kit can be built “wheels up” and there’s an option for the builder to use one of the standard Matchbox “M” stands, but thankfully, the slot is moulded closed.

The noses know! Here are the two cowling options for your Wellesley; the “normal” one is at the bottom, and the LRDU NACA cowl is at the top. This is a neat option.
The detail on the kit isn’t great, but the fabric parts (namely the wings and most of the fuselage) do look the part. Unlike the Trumpeter Wellington, that has too much fabric “sag” built into it, the Wellesley has a nice and relatively “taut” skin on its wings. The fuselage is also fairly subtle, given the lack of subtlety found elsewhere in the kit! The canopies are thick and have some distortion in them. One problem is with the rear canopy; it is designed to hinge open into the body, so it is mounted on pins. This means it must be installed when the fuselage is glued together. Well, either that, or the modeller can shave off the pins and create a mounting collar for the canopy for post-build insertion. Can you guess which approach I advocate?

Here you can see some of the fabric detal on the wings. Getting this right is a big deal, since the structure is a trademark of both the Wellesley and the Wellington. You can also see the simple engine.
Decals and Instructions:
The decals are nice on this kit, because they are much newer than they would be on the original Matchbox. One downside, though, is that because they are Revell Germany decals, they will be quite thick, and they dry matte. I’ve also found that Revell Germany decals are very prone to silvering, and this is cause for extra care to be taken. For some reason, the red dot in the middle of the RAF roundels has been given as a separate piece, and this means there will be some “Decal on Decal” action. Hot!
There are some warning stencils, mostly for the underside, and the two call numbers for the two build options are equally nicely represented. There’s not much else, although there’s an interesting “walkway” decal that can be seen on the tops of a Wellesley’s wings indicating where they bolt to the body and where it’s safe to walk. With the matte decal film of the Revell decals and the fact they have to go over the fabric-covered geodetic framework, I can sense a lot of potential for difficulty in applying these.

It’s nice to have newer decals for what is, in reality, an old kit. However, the red on the RAF roundels looks a bit off-register.
The instructions, unfortunately, are not very good. I typically find Revell Germany’s instructions to be sloppy and unprofessional in appearance, and this is no exception. The drawings are not all that clear about what goes where, and on such a simple kit, that’s something of a major issue. Even more annoying is the fact that the variant options are not always clearly spelled out. Now, the Wellesley’s variants only deal with changes to the nose, but even then, a non-experienced modeller or one who hasn’t done his/her research may have problems sussing out the meaning of the poorly drawn arrows flying about. Overall, this kit is let down by the instructions. Even more interesting and unfortunate is that the kit gives you a choice between a standard air intake and one with the Vokes tropical air filter on it. Granted, the Vokes isn’t well detailed (neither is the normal one), but the fact it’s there means that if you wish to do an African/Middle Eastern combat Wellesley, you can. It’s a mystery why this piece isn’t called out in the instructions. If it is, I’ve missed it, because I can’t see it in there anyway. Of course, it could be because the instructions suck so badly.

Blech! I don’t like Revell Germany instructions, and these are no better than others I’ve seen. They’re vague, poorly rendered and confusing. Not good for a beginner, for sure!
Conclusions:
The Matchbox Wellesley is a solid, if unspectacular, kit. While it is simple, it doesn’t look like it’s going to necessarily be easy to work with, as no Matchbox ever really is. In addition, because it is so simple, there’s going to be a lot of work that has to be done to make it look really good. That having been said, the fabric effects look good, and I get the feeling that with some work, the Wellesley will be able to be made into something quite eye-catching.
If you’re a hardened modeller, you can surely do something with this kit. It’s also great for a beginner who’s less picky with the details and more eager just to get an airplane shape out the other end. It is a very unique-looking plane, and that alone might make it of more interest to people at both ends of the skill and expectation spectrum. It’s a great project for a tutoring undertaking; it’s not so complicated that the details will prevent a youngster from learning from building it, but not so basic as to be a waste of time. As with so many kits I review, it’s only really inappropriate for those whose desires overreach their abilities; this will definitely cause frustration for modellers more used to newer, more forgiving kits.
Overall, the Wellesley is a workmanlike kit of a very interesting plane. I would definitely recommend it to anyone interested in interwar aviation developments, as well as RAF fans and bomber enthusiasts. However, be prepared; like all Matchboxes, you’re going to have to really work on this one to get something nice out of it!
What have you got to loose but some hair and time? C’mon, give one a try!

Mike Grant did a really nice pretty close to OOB build up of this kit in SAMI about three or four years ago. You might want to look out for it. He didn’t seem to have a great deal of trouble with it.
Interesting! I’ll have to see if I can find that, for sure.
Looking at it I don’t expect it will be too problematic. It might be simple looking, but I’m sure there’s a lot of sanding; with Matchboxes, there usually is.
Just looked around online; it was in Vol. 16, issue 1, which was January 2010. Magazine had a Yak-3 on the cover.
Ah, awesome! Thanks a lot for finding that out for me. I appreciate it!