
Hasegawa’s little TX-40 is a neat replica of an important, albeit likely forgotten, battlefield asset.
Napoleon said that an army travels on its stomach. This is very true. However, he was conducting battles before mechanized weaponry was around to provide another set of “stomachs” to be filled; namely, the fuel tanks of the ground and air vehicles that make up so much of Post-WWI fighting forces. Just as with the troops in the front line, if you don’t feed the trucks and the planes, you’re really not going to have a whole lot of luck getting very far. This became increasingly apparent throughout the ‘20s and ‘30s, as armies began to increase their level of mechanization, and of course introduced increasingly numerous and more powerful, aircraft.
As armies and air forces became more mechanized, they became more complicated. Sure, you don’t have to bring as much hay with you to the battlefield, since you’re not feeding horses, and it’s true that airplanes don’t need a blacksmith to shoe them, but the increase in the logistical requirements of armies of machines was staggering to the military planners of the time. It was a true paradigm shift, and one that called for new tactics not only in how to employ the weapons, but how to service and feed them! To this end, the logistical corps of the world became ever more important, and the number and types of specialized vehicles developed to support the “modern” armed forces of the world was quite dizzying by the time WWII broke out in 1939.
For Japan, an island whose empire was other islands, thousands of miles away, logistics had a very special and important role to play. On the strategic end of things, the servicing of the Empire by shipping (primarily) and by air was of the utmost importance. However, at a tactical level, things couldn’t be ignored either. Engaged in a war that spread across the Pacific Ocean, Japan had to base combat aircraft on many island air strips, and keeping them fuelled and armed was a major task in itself. However, not all of these thorny logistical problems required complex solutions. At the “pointy end” of the aircraft fuelling problem could be found one of the more important, but more mundane elements of the Japanese logistical train: the humble gas truck.
One example of this kind of aircraft tender is the Isuzu TX-40, a basic, simple, rugged and unpretentious truck in the mould (rather literally) of the early ‘30s Ford medium-duty trucks. The TX-40 was a simple two-seat cab with a fabric roof, an engine and a frame, and to the back of it could be mounted any variety of apparatus. In many cases, though, the “back end” was just a set of metal fenders/walkways and an oval-shaped fuel tank with a pump attached. The TX-40 was small and nimble enough to fuel aircraft in the field, and powerful enough to haul enough gas to make it worthwhile.
It’s not surprising, though, that not a lot of models of this vehicle have been made. Support vehicles rarely get the same kind of love as MBTs and other more “aggressive” pieces of ground kit and next to the planes they service, the TX-40 gassers are certainly less than glamourous! Still, that didn’t stop Hasegawa from producing a nice little 1/72 model of this truck back in the ‘70s. I’m fairly certain they did this so that people could build airfield dioramas, a feeling supported by the fact that this kit is often included WITH aircraft kits for just such a purpose!
I picked up an old TX-40 at a model show a while back, and since I’ve never built a military truck before, I thought it was high time to give it a go. Put on your scale overalls and let’s see how the “working class” do it, shall we?
The Kit:
If you want to know how the kit looks out of the box, you can check out the Out of Box review.
Building/Painting the TX-40:
Hasegawa’s instructions for the TX-40 are quite simple and straightforward, and I must say that this is one of those cases where, if you follow the directions, you won’t go far wrong! Because the TX-40 is so modular, it’s a kit that you can build and paint all at once. That’s one thing I really liked about it, actually; you can do a tonne of work in parallel, and that, combined with the small size of the kit, allows it to be built up pretty quickly!
The first thing was to assemble the “frame”, which consisted of putting the leaf springs onto the lower frame/engine pan. I painted the lower frame in Model Master Acrylic (MMA) Aircraft Interior Black (AIB) after I primed it with Walmart-brand “Paint It” primer. There’s not a lot of engine detail, but I picked it out with MMA Steel so it would at least stand out. I also did the springs in steel, and then gave the engine and springs a wash with Citadel washes. First, I used Devlan Mud, as it as a rusty-brown tinge to it, and really helps to give steel a “raw, oxidized” look. Then I did some Nuln Oil which is blackish brown and adds shadow to the parts. It’s amazing how much different bare and washed steel looks, and I always have fun adding some “patina” on metal parts like this.

Here you can see the engine and front leaf springs, as well as part of the frame. The washes bring the metal bits to life!
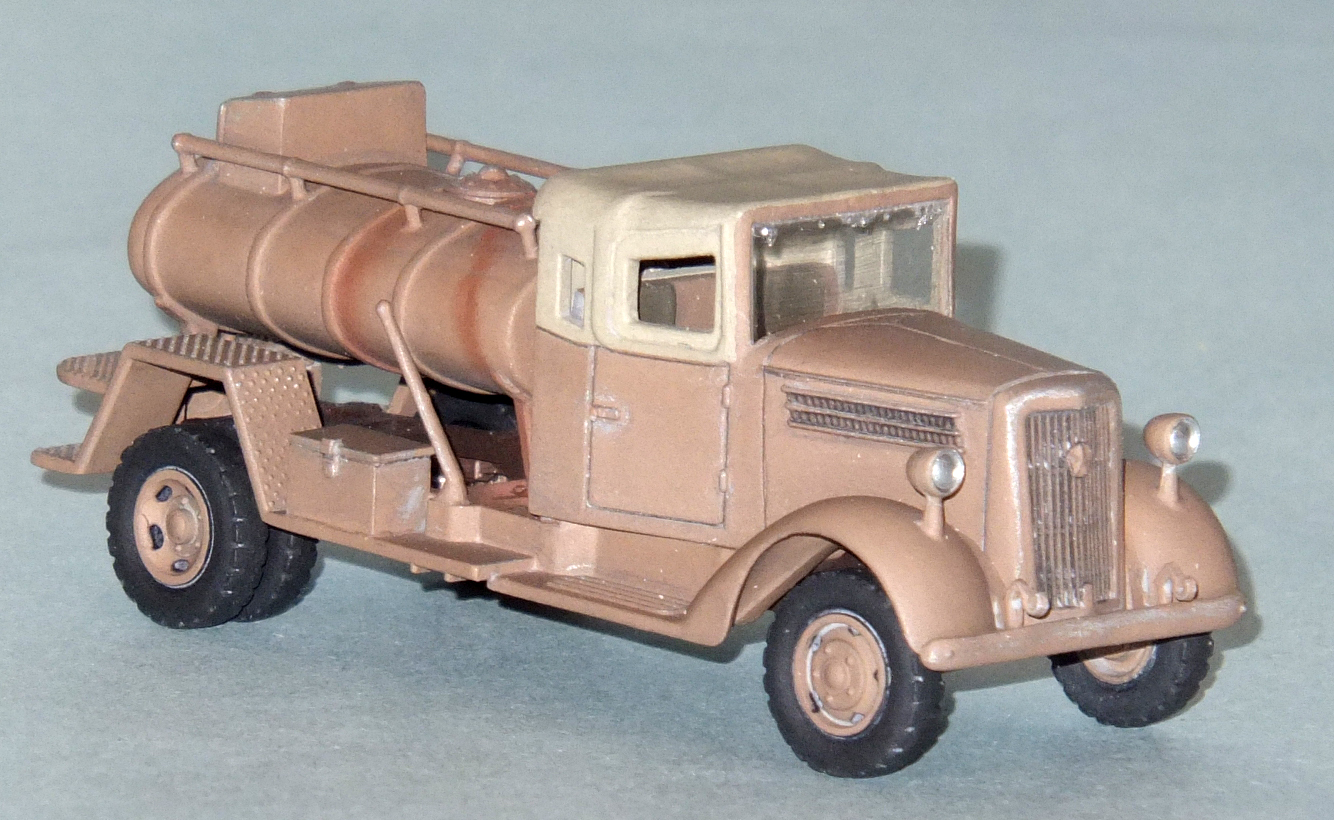
The next major builds are the gas tank and the cab. Here’s where I deviated a bit. I found that you could attach the grille shell to the hood/cab before installing it, and did so. This allowed me to get the contours sanded in and matched up. While the fit of the grille is good, it does require a bit of sanding to get it to look perfect, and of course it’s better to do this before painting! I also made sure I could put the windshield in afterwards, since it’s a lot easier than masking it! To some people’s inevitable chagrin, there’s no real “interior” in the kit. There’s a bench seat, a gear shift and a steering wheel. There’s no dashboard at all, but as it turns out, you don’t really miss it when the kit’s together. I contemplated scratchbuilding something to do the job and fill the gap where it should be… but then I thought better of it. It’s easy to make things too complicated, and the essence of this kit was simplicity and ease of build. So, I decided to just build it as it was, and see how it came out. Turns out, it’s fine!

Even from this angle, the small windows preclude anyone from seeing that there’s no dashboard or any other real interior. See… no biggie, and not worth obsessing over!
I needed a colour for the truck. Looking the TX-40 up on the internet will show all kinds of different colours for it, from a greyish scheme to olive drab to a brownish colour. What that told me is either they were painted to match local conditions (logical) or that nobody really knew the real colour (like on a Zero) and just did what they liked. That suited me fine, and I mixed up a colour that I felt had a south-seas, semi-faded look to it. It was made from a mixture of MMA Dark Tan, Olive Drab and I honestly can’t even remember what else. The end result, though, was just what I was looking for!
I sprayed the colour on using my 1/3 Future: 2/3 99% alcohol thinner. I find this thinner works really well for MMA paints, and it gives it a bit of a glossy finish if you’re looking to do decals or put washes into corners. Of course, the parts were all primered as the base was, before painting. I did the tires in AIB, and I used another old mixed colour to do the canvas top. This was a lighter colour, more like heavy burlap or some equally industrial fabric, and also did the job perfectly. Masking was easy, since the top is separated by a straight line from the metal part of the cab!

The brownish colour of the truck contrasts nicely with the canvas colour I made for the top.
No Matter the Weather:
At this point, the bulk of the work on the truck was actually done! Of course, no armour is complete without a bit of weathering, and this is where I had to decide how much I wanted to do on this little guy. For one thing, I’m not a fan of the current vogue of what I feel is “over weathering”. I didn’t want the truck looking like it had been sitting out for 50 years, and I didn’t feel that massively stack highlights and lowlights were necessary. However, I did want to highlight the few panel lines and give the whole thing a bit of a filter. Before that, I used a black wash on the grille shell to bring out the openings.
I started by using a filed down mechanical pencil to do the panel lines on “opening” parts; namely the doors and the hood. Sometimes, people forget that these seams are not very close, even on modern cars, and need to be starkly visible. Then, I flat coated the entire vehicle. Now, note that at this point, I hadn’t assembled it yet. I still had a cab, chassis, tank and rear decking/fenders all separate. This made weathering much easier! Once I had flatted everything, I used several light coats of a light grey chalk pastel, diluted with Varsol, to apply a filter coat to the truck’s components. I pushed the first coats into the corners to highlight them, and then the third coat I left on and then just ‘dusted’ off when I was done, to provide an overall dusty look. I re-flatted between each coat to protect what was already on there.

The doors and hood are pencilled in where they’d open. Best not to forget this detail, or the kit will look more like it’s carved from a solid block.
This worked well, by and large, but there was some “collected” dust that’s a bit too light. This is especially visible in the wheels and tires. I was hoping that a final coat of flat would tone it down, but it didn’t. I’ll know for next time to watch out for that! The pastels worked really well on the fabric top, highlighting its texturing and underlying “frame” (as moulded in) nicely! I added some rust streaks to the fuel tank as well, using a rust-coloured pastel. This I drybrushed on using a very short, stiff brush. I ran some streaks down each side of the tank, and had it collect at the bottom. This is how fluid runs around a container (the Coanda effect); it doesn’t just drip off the sides! I figured that AvGas would likely foul the paint and cause rusting in tropical climes. I have no idea if that’s so, and if I’m wrong, well, you can let me know! I also dusted some “rust” on the frame rails, leaving the the “pit” around the engine black, to simulate a “hole”.

Here you can see the “rusted” frame vs. the “black” pit around the engine. I do love the true duallies!

Henri Coanda works here! Here you can see the streaks from leaking gas have followed the tank’s ribbing and dripped off a collection point at the bottom of the tank.
I wanted the vehicle to look a bit more “used and abused”, so I took my silver Prismacolour pencil (something I got from my Grandfather 30 years ago) to add scraping to the tank rails, and highlight raised areas like the non-skid diamond plating on the rear deck and on the corners of the various boxes on the truck. This trick works well, is fun and super easy! I know these things cost a fortune now, but I still suggest everyone should have one. They’re also great for doing dials on car dash boards and aging plane cockpits!
With the sliver chipping on, I gave the kit one more flat coat and that was it. I think, looking at it now, that I would have been better to go with a slightly less dead-matte finish. Mind you, the super-flat does look good and faded, but I think it would look a bit better with just a touch of sheen. I also think that might have helped the “overdusting” in the wheels. Again, something for next time… The last thing to do was to stick it all together, and this went very well with no hiccups at all!

From above, you can see the simulated wear on the rails, tank and diamond plate, all done with my late Grandfather’s silver pencil crayon. Thanks Pa!
Conclusions:
While it’s not large and not famous, the little 1/72 TX-40 is a fun and cool-looking little kit. It’s not something most people will bother to build on its own, but I like having it on display. It adds scale to the aircraft around it and despite its drab appearance, it still draws the eye because it makes you ask: “Hey, is that a gas truck?”
The kit is simple, well-moulded and builds easily. This is a great kit for a beginner, and a very experienced hand can, I’m sure, go to town with it. The low piece count won’t bother a novice, and will, I feel, help encourage beginners to build more armour. For me, overly fiddly and complicated armour kits are just not cool. I don’t want to glue on every bloody tread block and cylinder head bolt. I just want a quick, cute little tank/truck model. This kit delivers that and then some. If you want more out of it, you’re free to do so, and that’s why I think this is a great kit for pretty much everybody!
It’s a great canvas for weathering, an awesome diorama accessory. It even has potential for civilian schemes! If you’re building a country scene and want an old farm truck, the TX-40 looks American enough to likely pass unnoticed as a Ford, Chev or something close to all but the best-informed! When you consider all the things a scratch builder could make on the back (once the gas tank is removed), this kit just calls out to be built!
There’s really nothing not to like about this kit. It won’t break the bank, suck down a fortune in supplies or cost you months of your life. It will help you enjoy modelling and break a streak of AMS, should you be stuck in a rut wherein no amount of rivet counting can break you loose. I liked it, and I encourage anyone else who might want one to pick it up if you see it.

Together again! This is the ancient Farpro Myrt parked beside the in-scale TX-40. The plane was a far, far worse kit!
