

Is it lying in wait, or is the crater the reason for stopping? It’s up to the builder, and reader, to decide!
While it wasn’t completely clear in WWI, the importance of air power to the troops on the ground had been made manifestly clear by the middle of WWII. The ability of enemy aircraft to disrupt and destroy troops and vehicles on the ground had reached new heights by the time the Allies were invading Europe. With heavy cannons, bombs, rockets and ever-faster aircraft, both sides could, and did, wreak havoc on their enemy’s ground forces. The question, for ground troops, changed from “How can we blow that guy up?”, to “How can we NOT get blown up?”
This very important paradigm shift highlights the fact that, up to that point, mobile anti-aircraft artillery (AAA or “Triple A”) wasn’t something that had been afforded high priority. In today’s world of powerful localized air defence equipment this may seem bizarre, but mobile AAA systems designed to counter low-flying attackers was a new area, and there were a lot of different concepts tried out. The Germans were fond of mounting Flak guns on tank chassis, although halftracks could be used too. As for the US Army, the solution was to create a mobile AAA machine out of the ubiquitous M3 halftrack.
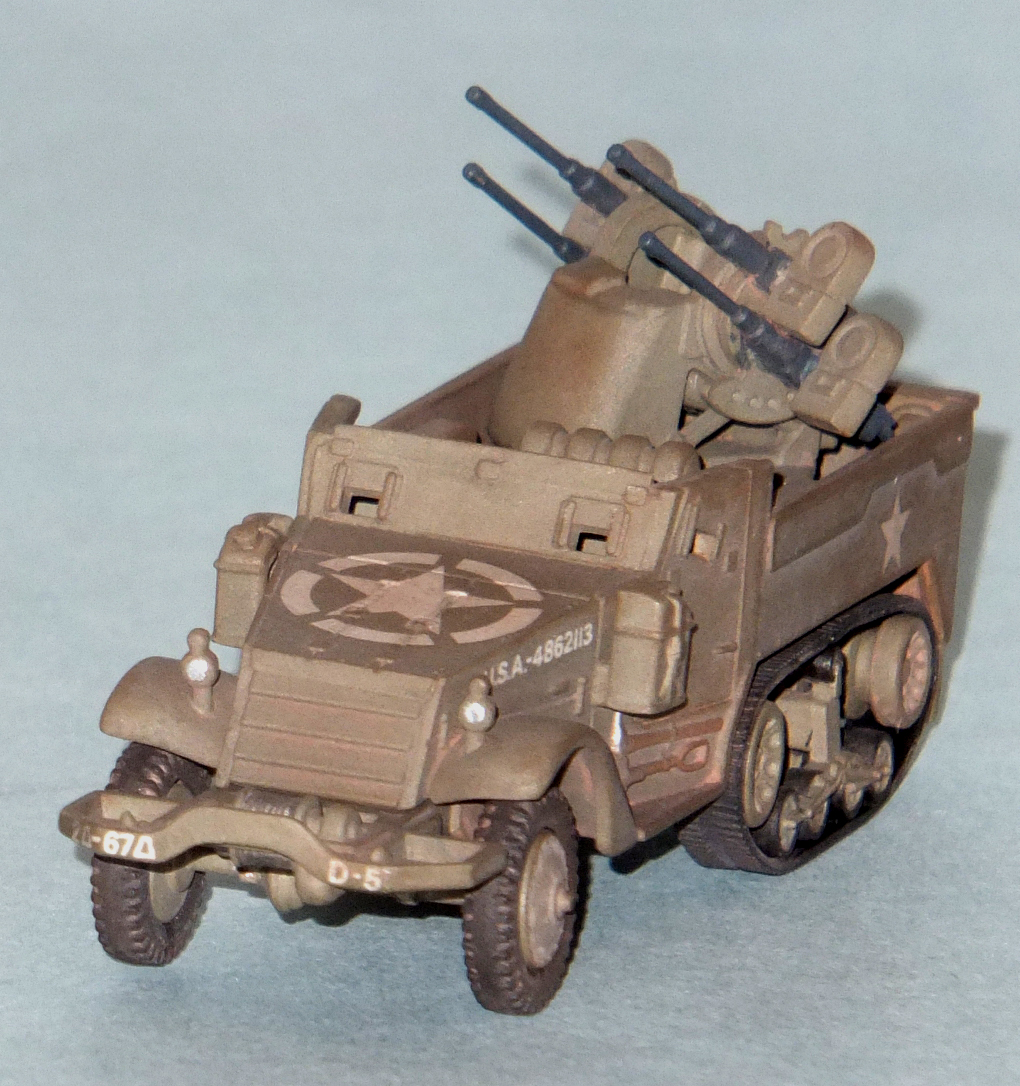
The resulting vehicle was known as the M16, and packed a lot of firepower into a small package. The new turret mounted on the “meat chopper” (as the vehicle was quickly and appropriately nicknamed) packed as much punch as many fighters of the day: four .50 Cal M2 heavy machine guns! These four guns were mounted on an elevating and traversing turret in the open back of the M3. The machine’s good speed and cross country ability made it a good choice for such a conversion, and M16s saw post-war service with many armies.
If there was a deficiency in the vehicle, it is that the trusty .50 Cal wasn’t the hardest hitting AA gun in the world. Larger weapons, like the excellent 40mm Bofors, would have been a better choice, since they were able to reach out farther and higher to protect the troops on the ground. However, the weight and size made them non-starters for mounting on something like an M3. Besides, what the .50 Cal lacked in range it made up for in versatility. Until the start of the war, the .50 Cal was considered to be an anti-tank gun, and while it was no longer good for that by 1943, it was certainly able to do fatal damage to soft skinned vehicles, artillery and people. This made the M16 useful for not only AA support, but also direct fires support of ground forces.
Given the many roles and users of the M16, it’s obvious that it would be a much-kitted subject. One of the more obscure kits is the old Matchbox 1/76 rendition, which first came out in 1974. While this kit has also been released as a Revell Germany kit, it’s still relatively uncommon because of its age and bizarre scale. Given my love of Matchbox kits, it’s not a surprise that this is the one I homed in on!
The Kit:
The Matchbox M16 is completely typical of any Matchbox (or later Revell Germany repop) armour kit. The model comes in two colours and includes marking options for two machines, both late war and in the European theatre. The model also comes with Matchbox’s unique “mini diorama base”, in this case a small section of blown out railway track and embankment. I will admit that the coolness of the diorama base was a non-trivial factor in making me decide to buy this particular kit. I’m not a big fan of Allied armour, but I really wanted to see what I could do with the base!
For a more detailed look at the kit, I will direct you to the Out of Box Review. Enjoy!
Building the Meat Chopper:
Given how small the Matchbox armour kits build up, and how small their boxes are, I continue to be impressed by the number of pieces in these kits. Despite the fact that the diorama base accounts for likely half the plastic on this kit, the other half is made up of a lot of small pieces as well as a few major subassemblies for the body of the vehicle. There is also a separate, largely complete, chassis.
The M16 is not a difficult vehicle to build. The entire body is a box; the sides and back and front all glue onto a single bottom pan. The location of the parts is excellent; there are small tabs at the corners of the fighting compartment that ‘sit’ on the tops of the track wells, and similar tabs up front. Now, I can see how you might be thinking: “Oh great, that’s going to look terrible when it’s done with those tabs sitting unrealistically in the corners!”. You’d be right, but Matchbox – they’re smart. They find a way to cover up ALL of the tabs with spare ammo boxes and other cabin junk. Nice work!

In the back corner, weighing in at embarrasingly obvious: TABS! In the front corner, weighing in at beautifully hidden: Post-Assembly tabs! Matchbox hides the obvious tabs well!
The back of the driver’s compartment, complete with seat backs, is a separate piece that acts as a stiffener for the vehicle. The front windscreen is provided in the “armour-down” configuration, meaning it’s largely solid save for the two view slots. The doors are separate pieces, and if you wanted to you could glue them open to add life to a diorama. This also means, however, that you’d need some extra figures; the only figure that comes with this M16 is the “halfie” who mans the turret!

The fighting compartment is simple, but not a tab to be seen. The cockpit is pretty simple too, actually!
The body is completed by the back wall and grille assemblies. Then, it’s greeblie time! There is a trailer hitch, some ammo boxes, what might be a fuel tank and some other stuff that I put into the fighting compartment right away. I did not glue in the turret base at this point, but you could and it would be fine. I didn’t attach the gas cans on the sides of the fenders, because it will be easier to paint them off the vehicle. However, I did attach the very fragile looking but remarkably strong headlight stalks. I left the steering wheel out to make painting the seats easer, too. With the open top, it’s no problem to install it at the end of the build.
The turret is a bit of a problem, build-wise. It is designed so that the seat plugs into the two gun mounts through a hollow part of the turret. This is so that as you elevate the guns, the seat tilts the same. I assume this is similar to the real vehicle, but it makes trying to get the turret together rather troublesome. If you do it this way, you have the guns sticking out while you’re trying to sand the front of the turret, and you KNOW something’s going to break. Also, it means the inside of the turret must be painted before assembly. Now, there’s nothing in there, but you still want some paint on the surfaces.
To ameliorate this situation, I just assembled the turret halves and cut the mounting “ears” off the seat. This way, I can glue the gun mounts, once complete, to the turret sides and then stick in the seat. As it turns out, this is the best way to do it. There is a small sighting arm that goes across the turret for the gunner, and it is in the kit. However, as I was cutting it the part sprang off to eternity somewhere. I’m sure I’ll find it years from now yards from where I think it could have landed! So, no sighting system for this turret!
The track rollers and main sprockets/idlers are all in halves, but glue together very easily. I didn’t even bother with the sprockets and idlers. They fit on the main axles at the end of the build, so it was fine to just leave them in halves. The suspension block can blue glued in before painting, if you want, but it’s easier to leave it until the end. It fits onto a flat face, and is keyed for fairly good positive location. One small detail that I felt needed improvement was the member than runs between the two track mounting brackets. There are three circular recesses in this member, and it looks like it would be drilled out on a real vehicle, to save weight. Using a small drill, I opened these up. The effect is surprising and impressive, and helps the chassis look less like a toy.

The large cross member looks like those depressions should be holes. It looks cheesy otherwise.

Here’s the chassis with the holes drilled out. Much better!
The tracks are the old, standard “rubber band” style that Matchbox (and others) love. They were assembled and glued with Tacky Glue. They were kept at maximum extension using some spreader clamps. The Tacky Glue works amazingly well on the track material; it’s the only glue I’ve found that you can rely on for keeping them glued together. They should not be put on until all the painting is done, however. Thankfully, Matchbox thought of this, and made the chassis a separate part from the rest of the truck. This means you can just drop the body onto the completed chassis at the end!
Painting, Decalling and Weathering:
Simple is good. As far as colour schemes go, it doesn’t come much simpler than an M16. The halftrack is just all olive drab, what isn’t rubber. I primered the kit with two VERY LIGHT coats of Colorplace rattlecan primer. I did not primer the tracks, unlike on the Panzer II, since the tracks on M16s are actually black rubber! I did, however, “rough them up” with a coat of Delta Ceramcoat Matte Indoor/Outdoor Urethane varnish, airbrushed at about 15psi. This makes the rubber more able to accept weathering treatments later. This varnish is, so far, the only coating I’ve seen that can actually flex with the tracks enough that it didn’t crack and fall off in plates.
Once the primer was dry, I used Testors Model Master Acrylic (MMA) Olive Drab to paint literally everything except the front tires. I then painted the seating surfaces in MMA Leather, and painted the exhaust system with MMA Steel. To this I applied some Citadel Nuln Oil wash, to darken it a bit, and then I applied some Citadel Devlan mud to give the impression of some light surface rust. I also heavily rusted the end portion of the pipe by daubing on a bit of rust-coloured chalk pastel, and then matte varnishing it in place.
I was very surprised by the amount of detail on the chassis of the vehicle. While the vehicle is a curbsider (no engine detail), there are small suspension details moulded to the chassis, such as the leaf springs for the front axle and the small spring between the rear frame and the bogey unit. I painted these springs in Steel and gave them Nuln Oil washes as well. One other thing that I found interesting is that even though the engine was only the “lower half” of a motor, it was detailed enough that there was a main pulley, transfer case and transmission. Also, the exhaust pipe not only stuck out past the frame, but also looped up over the driving axle on the tracks! You can’t see this too well when the model’s done, but it’s a nice touch.

From this angle you can see the exhaust pipe in aged steel, and the very rusty end that exits under the right track.
I painted the tail lights with MMA Guards red, and the four M2s were done in MMA Gunmetal. Everything was glossed and readied for decals. Even though the decals were old, I held out great hope that they would work well. I have always liked Matchbox decals better than all others; they’re tough but conform well to most shapes and they’re glossy, which is exactly what I like. I was not disappointed. The Stars on the sides and back went on without a hitch, as did the hood decal.

Here you can see some of the tools moulded onto the body. The entire chassis fits on afterwards, which is nice.
The bumper decals weren’t as good. They didn’t quite fit onto the surface properly; they were a bit too large, and there was tiny bit of decal film that overhung each side. This wasn’t really a problem; once the decals were on and the Future over them had dried, I just used a brand new #11 blade to trim most of the excess off. With all the decals down and locked in with a hand brushed coat of Future, I matte-coated the whole vehicle in preparation for pastelling.
The first layer of pastels I did was a slightly darker green than the vehicle itself. This was to give a filtering effect and darken up the corners and lines on the M16. The pastel was custom ground from artists’ chalk pastels, and applied using a small brush. I then used Varsol to dissolve the pastels and move them around. Once dry, I used a small swab to “even out” the effect. I re-matted the M16 and took a look at the results. I thought I might need another coat, but the difference in shade was pronounced enough. In hindsight, I think two thinner coats would have been better. The variations in the surface shading were almost as pronounced as the darkening in the ‘shadow’ areas. Two thinner applications would prevent this, I think.

This view highlights the tail lights and the general dirtiness of the rear-mounted stowage.
With the filtering layer over-coated with Delta Ceramcoat Matte Urethane Varnish, I began to apply some brownish pastels to show dust on the vehicle. I used a custom blended medium brown that I hoped would look like dried dirt or mud dust. I applied it heavily to the underside of the vehicle in a couple of applications, and it looked passable. I also applied a couple of thinner coats to the vehicle’s topside, attempting to get higher concentrations in the corners of the fighting compartment and running boards. I was pretty pleased with how the Varsol and chalk method worked, but again, I think I tried to do too much, too fast. I should have used about 4 applications that were thinner. The way I have it, the vehicle does look dusty, but it looks a bit too dusty. The Olive Drab underneath almost looks obscured completely. Still, considering this is only my second armour kit, it’s not going to be a deal breaker.
Here you can see the headlight lenses in silver and the bumper decals that didn’t quite work.
All Your (Mini-Diorama) Base are Belong to Us:
One of the unique features of the Matchbox armour kits (and their Revell Germany reboxings) is their mini diorama bases. Matchbox seems to have thought that armour needed context; thus each one of their 1/76 armour kits comes with some kind of base/background. Now, these aren’t always appropriate (for example, the Wespe never served in the desert, but it comes with a sand/palm tree base), but they are a neat idea.
The M16 comes with a most interesting base. In fact, one of the reasons I got the kit was because I liked the base so much. It is a blown up piece of railway line, with dirt embankments on either side. The base comes moulded in 3 pieces; each embankment is separate from the track/gravel section. The bases are normally not complicated, parts wise, but can represent a real challenge for painting. This was just such a case.
To try and make plastic look like dirt isn’t easy. I started by primering everything using the same Colorplace Grey rattlecan as I used on the M16 itself. Then, I painted the base of the train track. I did it in MMA Light Ghost Grey, to give a “limestone” effect. I then painted the ties a near-black colour and the rails in MMA Steel. The hardest part was the crater in the middle of the track. I waited until I had the two embankments done, then copied that approach.

There’s a lot of work in the base: Here you can see the imprecise first-pass at paiting the track, bed and crater. It takes a lot of touching up to make this single formed peice look like several separate features!
I first painted the “dirt” using MMA Dark Sienna. I then applied a number of layers of ground paste/Varsol washes, to give the dirt some depth and irregularity in surface colour. Then, to pick out the deep areas, I used a black pastel/Varsol wash, but applied it very lightly. This let the black into the deeper areas but didn’t discolour the browns much. Of course, between every application of pastel/Varsol wash, a layer of Matte Urethane Varnish was put down to insulate the layers below. In only a few layers, I was able to create a surprisingly dynamic depiction of a dirt hill.

Wow. That’s boring! Without any shading, drybrushing or washing, the dirt mounds look pretty cheap, even though they are painted!
I applied this same method to the track crater. For the railway ties themselves, I used a light grey pastel to ‘bleach’ them a bit. The stones/gravel were given several washes with a dark grey pastel, but it didn’t work as well as I’d hoped. The stones don’t look that “deep”. I think that a layer or two of the black pastel would have worked wonders, but I didn’t want to mess things up. I was, at one point, going to use some Woodland Scenics plant material to put weeds growning up through the gravel and on the sides of the hill. However, there are other bases in my collection that are more appropriate for that, so in the end, I just went with bare dirt.

You can see some of the shading and drybrushing on the dirt mounds from this angle.

From above, you can see the crater much better, as well as the detail on the dirt and rail bed.
Conclusions:
Like all Matchbox armour, the little M16 is a surprisingly good kit. Sure, it’s a bit of a let down on interior detail, even at this size, but most kits from this age would be, and it doesn’t bother me at all. Superdetailers and their like will be put off from this, but for someone new to armour, like myself, or a younger/less-experienced modeller, this shouldn’t be a real deal breaker.
The kit offers good surface detail and I was surprised by the attention paid to the drivetrain. In addition, the fit of the kit is great, so it’s not a lot of work to put it all together. Combine this with a neat little diorama base, and you’ve got a perfect project to break a streak of Advanced Modeller’s Syndrome (AMS)!
I got a chance to practice more weathering and filtering techniques on this kit, as well as my first chance to do groundwork. That’s what these old Matchboxes are really good for; they’re a great place to try new methods and expand your skills! Now I know it’s better to go with multiple very thin coats when doing ‘dusting’ and gradually build up the effect.
Overall, I’m very pleased with both the kit itself and how it turned out. It certainly makes me want to keep building armour, so it’s very successful from that standpoint! I would recommend it to anyone; it’s a simple, fun and passably accurate model that doesn’t take up shelf space and isn’t going to give you trouble you don’t want. This kit is a lot of fun, grab one (or several!) to help keep the enemy from strafing the rest of your armour collection!

It was pretty simple, and a lot of fun, too! The M16 let me play a bit more with my armour skills, and was the first exercise I’ve had in doing any kind of groundwork.
