With the bodywork complete and the engine and chassis done, it was time to get things really underway on the BRAT. This meant getting the interior done, and getting the body into paint. Normally, I’m used to interiors taking quite some time. However, being a pickup, and a small one at that, the BRAT doesn’t have much of an interior! All it has are two seats, a dashboard/steering wheel and a couple of floor-mounted handles. It doesn’t even have a back wall, since I glued that to the pickup bed.
Inner Beauty:
One nice thing about the BRAT is it has several choices for interior colours. There’s black, but there are also blue and tan, and there might have been a red, although I don’t have any pics to prove this. I mentioned earlier that I had found pictures of a silver BRAT with blue interior; this is a nice combination, and not one I’ve modelled before. Thus, I decided to clone it and see how it looked.
Before doing that, though, I had to “go Japanese” on this kit. Like many a Tamiya before it, the BRAT didn’t have backs on the seats. This is weird, to me, on an American car kit. WTF? Really? I mean, you can see the seats through the back window. Sure, you might not notice it at first, but once you see that, you don’t unsee it. Thus, I took some thin sheet styrene, glued it to the back of the seat and then cut/trimmed and sanded it to integrate it into the seat. It’s not much and it’ isn’t special, but it does help to close out (pun intended) the issue.

Oh come on, AMT! I know it’s a Japanese subject, but you didn’t have to follow Tamiya’s lead and forget the seat backs! Here you can see my own seat backs underway. Simple and it worked.
I primed the interior in Rustoleum grey primer, because I find blues go over dark grey better than light grey. Not sure why, mind you, but I’ve painted enough Gundams to tell you that it’s true! The key then was to find the right blue. It’s an odd colour; to drab for an MS, but too bright for anything else. Thus, I had nothing that would do the job, so it was mixing time! I started with some MMA Flat White, added MMA GM Engine Block Blue and some little bit of Light Ghost Grey. This gave me a colour almost dead-on as far as colour matching went.
As is my wont, I hand painted the interior. I love to paint; it’s why I model. You could airbrush it if you want, but an interior is a bad place for runs, peels, etc. I just go with hand painting. The colour I came up with went on beautifully; Testors blues and greys really are their best! I even painted the dash all blue first, although it needed a tonne of work.
One key area in an interior (although one you almost never see, especially in the BRAT) is the carpet. This is one area where the Japanese fall flat, in general, on their car kits. Sure automotive carpet is not as ‘knappy’ as MPC and AMT would have you believe. However, it’s also not as flat as a plate of plastic, as Tamiya would have it. Like all things, the truth is in the middle. I personally love to bring out the carpet in a “three layer” approach. First, I painted it blue. Then I ground up some hard chalk pastels in a complimentary but darker blue and spread it onto the floor. I do this dry, dusting it into place. I then blow out the extra and brush it off of any place it shouldn’t be, like the door panels and firewall.
I flat-coated the entire bucket in Delta Ceramcoat Indoor/Outdoor Satin Urethane Varnish, which dries quite flat. I then took a light blue Prismacolour colour pencil and “dry brushed” on the highlights. Basically, I just rub gently on the carpet, and the light colour comes up on the high spots. Another coat of varnish sealed it all in, and the carpet was done! Some might comment that it’s too stark. However, if people can do the crazy amount of weathering that seems to be the vogue on tanks and figures, then surely I’m allowed to slightly over-emphasize my carpet for visual effect, right?

It may seem stark in this photo, but the “three layer” carpet treatment looks great once the bucket is all buttoned up inside the car.
Another consideration for interiors is preventing them from becoming a boring sea of one colour. Door panels and seats are usually similar, if not the same, colour. On the BRAT, both are vinyl, so they’re identical in terms of material and colour. So, to keep it interesting, I used a very light wash of the darker blue pastel I used on the carpet. This got into the lines on the trial seat, but wouldn’t clean up right. I actually had to repaint the seat. I thus went back to “first principles”, which for me is using a drastically cut-down #0 brush to apply the pastel powder directly to the target surface. This keeps it contained and the rest of the surface clean, while allowing some feathering in of the colour and getting the ‘shadow’ areas darker.
This worked great on the doors and seats both! I flatted both and then used my “Hand Vinyl” to make them more sickly shiny, like new vinyl. “Hand Vinyl” consists of water, Delta Ceramcoat Indoor/Outdoor Satin Urethane Varnish and Future. It dries slick-ish, but not glossy. It’s a very, very “high” satin. However, it hand brushes very well, unlike most other top coats, and it can be used to build up a sheen. The next bit of detail is the handles on the door, and the rubber mat. The mat was done in Aircraft Interior black and given a dose of Hand Vinyl, and the door handles were done using a filed-down toothpick and Molotow Chrome. You’re going to likely see that again on this kit, and for good reason. IT RULES!!
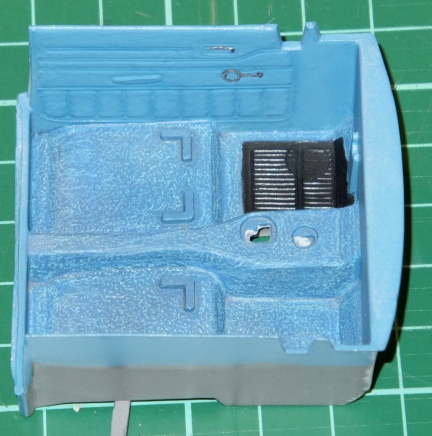
Here you can see the door panels picked out with blue pastel. It’s barely visible without a flash, just a hint of a shadow. Perfect!
The dashboard on the Brat is the same blue as the seats, except for the instrument area, which is black, and a woodgrain panel all across it. The woodgrain, of course, posed an interesting challenge. I painted the panel in a medium brown (again, a mix I had from something) and then used a sharp, dark brown pencil crayon to draw on the “grain”. The effect was actually really cool! I know the grain is a bit too coarse, but from a bit of distance, and since it’s inside the cabin, it serves its purpose well. It shows some tonal variations and does give the impression of wood! There’s also a dark blue (it seems, at least, from pictures) panel around the vents in the lower centre of the dash, and I used MMA Dark Sea Blue for that. I used black on the vents and radio, and silver on the knobs; the glove box lock was Molotow Chrome. I used a silver Prismacolour pencil to pick out the instrument faces and controls, too. The detail on the instruments was soft, so it’s a bit of a mess, but again, from a distance, it’s fine.

Here’s the dashboard, complete with woodgrain. The top contour is a bit wobbly on the original, and I assume it’s no better in the reissue. I would have liked a decal dash, though, like in the new kit.
Assembly of the interior is simplicity itself, and the parking brake and shifter fit fine in their holes. I’m not sure about the hand brake’s orientation; it seems a bit far under the dashboard. Still, it fit without interference, so I left it! Maybe it’s not a handbrake after all? Is it something to do with the 4WD system? I doubt it, only because I think the BRATs were full-time 4WD. If anyone knows, drop a comment in at the end!
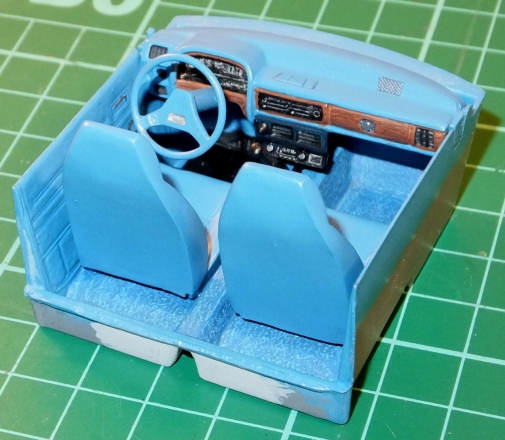
This angle gives you a good look at the dash and seats and how they fit in. From a distance, it looks rather convincing, I think.

From this angle, the subtle shading on the seats and door can be seen. That’s a lot of blue, but it’s very much what the real thing looks like!
Back to the Body:
Now it was time to work on the body. I actually did this in parallel with the interior, but it would be confusing to read it that way!
The first thing that needed doing was primer, and I used the Rustoleum for this. The dark grey would add some depth to the silver, I figured. Before silver, though, I had to get the bed done. Now, this is a bone of contention for me; the bed on this thing is wrong, in a couple of ways. Firstly, the fender wells should be different on each side; photos of real BRATs show that there’s an extra bump on the side with the fuel filler door. I assume this bump is to cover the fuel tank filler neck. AMT more or less ignored this. Secondly, one of the quirks of the BRAT was not only that it had rear-facing, barely-safe (okay, totally unsafe, fine…) seats, but also that it had carpet in the bed. Yes, carpet. That was part of the “it’s a car, not a truck” illusion they pulled to avoid the Chicken Tax.
Can you imagine how gross automotive carpet, exposed to the elements, would get? In reality, I’ve heard the “carpet” was kind of rubberized, but there aren’t many good references to this, since on existing cars it’s either rotted away (Really? Who’d have thought?) or been pulled because no one wants to hold water against cheap late-70s Subaru steel. Good plan either way. To simulate this, then, I painted the bed floor flat black and gave it a satin coat with some Future-infused Delta Ceramcoat Indoor/Outdoor Satin Urethane Varnish. I realize that the pattern on the bed floor is supposed to represent bare metal; however, it’s also apparently incorrect for a BRAT, so I went with the black to at least evoke the carpet.
I gave the bed carpet a semi-gloss sheen with “high satin”, basically my matte coat with Future in it to bring up the shine. I baked it for a couple of days in the dehydrator, and then, masked it off with Tamiya tape. I also masked the inside of the cab, since I didn’t want to overpaint the nice blue headliner and pillars. Once the masking was done, I re-primed the over-painted areas and let the kit bake for another day at 42 degrees Celsius. One thing; Tamiya tape hardens at this temperature after a while, so be prepared for it to be plenty welded on when removing it. It rarely pulls paint, but there’s always that risk…
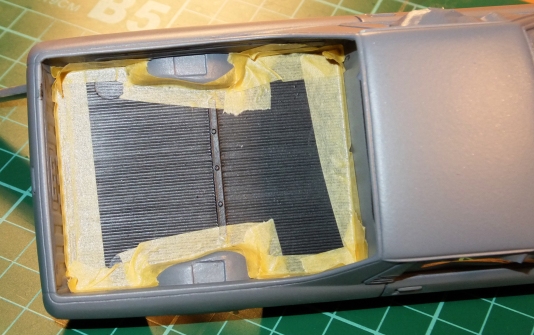
This shows the black in the bed. I’ve already started to mask it; not an easy or fun job, but certainly necessary!
With the primer dry, I applied several coats of Testors MMA Silver. I’ve never used the MMA metallic in the airbrush. They’re not easy to use. I found the metallic itself was rather uneven, even after several coats, and it was prone to running; far more than a solid colour. One thing I learned later was that I should have sanded more. With metallic colours that are made from Jacquard pigments, you don’t need to sand every coat to take off high points; the metallic bits are tiny, and thus don’t really affect anything. However, the metallic bits in the MMA paints are larger, and do leave a rougher surface. Lots of thin coats with constant sanding might work. Several heavier coats didn’t work perfectly. In fact, there was one time where the paint went on too thick, and it left a whitish halo around it. WTF? I sanded it down and reapplied the paint and it was okay, but that was a shock.
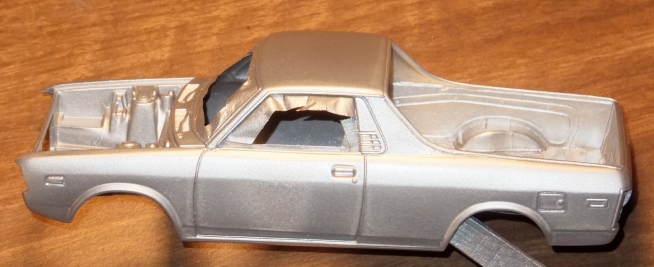
See the weird haloing effect on the door? I don’t know what that was all about. It’s a strange property of MMA metallics, it seems.
Once the paint was on, and baked for about 3 days at 45 degrees Celsius, it was ready to sand. NOTE: the higher temp helps the Future I use as part of my airbrush thinner to dry and bond better. I sanded it lightly with 3600 and 4000, and then applied a coat of Alclad Aqua Gloss. You’ve heard me rave about it, and it is still the best stuff going. I will need multiple sand/coat iterations, however, it appears!
Decal-o-mania:
Sadly, the decals that came with my BRAT were old and damaged. However, one kind soul (you know who you are) sent me his perfectly preserved original decals. I decided to scan them in case something went wrong, but I had a good feeling about them. I hit them with a couple light coats of Testors Decal Bonder. This worked wonders for the Gold Rush decals, and I expected the same here. Of course, that was not to be. The decal broke up and was irrecoverable. There were some choice words at that point; the atmosphere of my table turned just a bit bluish for a few minutes.
I really didn’t know what to do. I realized that the decals were likely an option; I’ve seen BRATs without them. Sure, I could do a decal-delete version. However, I then figured maybe I could just run a copy of the decals off on my printer and it’d be okay. Uh huh. For whatever reason, the original decals on the BRAT are totally, utterly, completely and without salvation the wrong shape and size. I have no idea what they were thinking. The decals just do not fit. DO NOT. Not “don’t fit quite right” or “need some adjusting”. No. They just don’t fit. It’s like trying to fit the glass slipper onto one of Cinderella’s stepsisters’ feet. The shape and size is just not going to let it happen.
I was a bit despondent at this point. One of the key distinguishing features of the BRAT is the stripe. It’s as important as a T/A’s hood bird, to me. So, I tried blowing up and shrinking the decals. That wasn’t it either. No, the issue was size AND shape. Thus, I settled down to make use of my massive photo adjustment skills. This is sarcasm, should you fail to notice it. I am barely conversant with the very basics of Photoshop, so it took a while to isolate just the stripe and then I had to figure out how to adjust it.

Nope: That’s not it. That’s the original decal (well, a paper copy, but the same shape) on the kit. Uh… what? Not even close… Nice, AMT!
What I did was to cheat; at least somewhat. I scanned both sides of the BRAT. I put it right on the scanner and hit go. I’m glad I did this, because both sides were a bit different from each other. Then, I used MS Word. MS Word is my kind of photoshopping program, because I can stretch, squish, invert, and rotate a text box with an image in it. I can also control the transparency of an image pasted in as a shape! So, I pasted in the full-size scan of the BRAT and then pasted a shape over it. The “shape” was the isolated decal! I then stretched, positioned, fiddled, tweaked, squished and bent the image until it fit the window pillar and ran along my chrome bed trim.

This is a shot of my Word document. The decals are made semi-transparent so I can “see” how they fit on the BRAT scan underneath. Crude, but effective.
This was a long, sometimes almost torturous, process. To test things when I thought I had it right, I would print a decal on normal printer paper, cut it out and see. There were a few false starts and more than once I thought “Oh, that’s good enough…” However, we all know that’s utter self-deception and disrespect of the subject matter of the first order. It’s only “good enough” when it’s right on a job like this, so I persisted and finally got both sides to look pretty darned good when I was done. I then created a decal sheet with two for each side, since Testors decals always need two layers to look right.
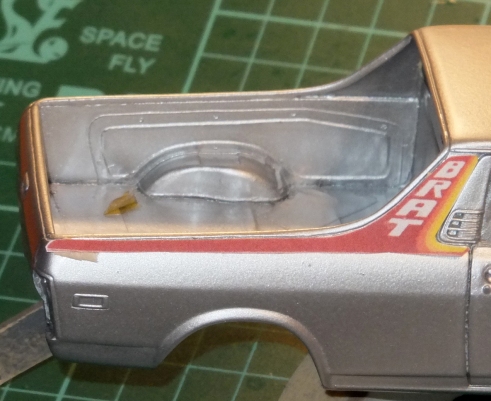
There we go! That’s far and away better! Suck it, AMT! It only took 40 years of technological improvement to fix your screw up!
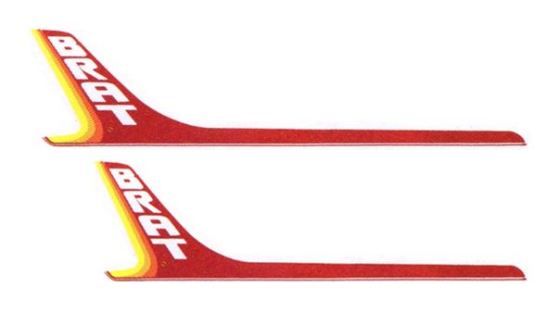
The new decal is above, the original is below. It may not look like a lot of difference, but the length, sail panel angle and width of the panel are all different.
Conclusions:
With the interior done and the paint on, not to mention the decal hurdle cleared, I will admit I started to feel pretty good. Sure, the tires and wheels are left, and in my head I heard the voices of past experience whispering tales of doom come final assembly time. Still, I was so pleased with the decals that I figured there’s not much else that can go wrong that I can’t fix. Let’s hope that was right, eh?
Those who have the reissue kit have an infinitely superior decal sheet to work from. A friend sent me a scan of that sheet; I honest thought I’d have to print my own version of those decals! However, I persisted on making the originals work, and I’m glad I did. They’re more correct for this kit. “Why?” you ask? Well, from what I can tell, the stripes in the kit are those that adorned the first few years of BRAT, at least the ’78s and ‘79s. That’s what this kit is; you can tell because of the round air cleaner. Later ones had the “bean”-shaped ones. Since I’ve done all I can to be authentic (within limits), I felt it was important to recreate the kit as close to the original intent as I could, and using as close to authentic-for-the-year striping. The real stripes should say “Subaru” on them, but AMT didn’t get that memo, I guess.
All that’s left now is to apply the decals, gloss, polish and assemble, really. Any bets it gets ugly? Tune in later to find out! (Assuming it doesn’t kill me, of course…)

coming along very nicely, taking that extra time with the decals on this model will be a huge payoff
Thanks, Lou!
Yeah, I couldn’t just leave it without them. Here’s hoping it works out!
Looks awesome Adam! Its really ashamed about the old decals and haw bad some are on some if the kits.
Thanks Anthony!
I agree: decals have come a long, LONG way. It’s like they never even built a test model of the BRAT to see how bad the fit was! God Bless “Word CAD”! 🙂 It takes 40 years of technical progress to correct the laziness of a bygone era. Kinda sad, but worth it in the end!