
If there’s one kind of kit I love, yet don’t have a lot of, it’s anime figures. There are a number of reasons for this: They’re usually very hard to find, very expensive and usually made of resin or vinyl. There are very few injection-moulded styrene anime figures out there… or at least, there weren’t many until very recently.
Clearly, the good folks at Bandai realized that figure kits were a slice of the market they were losing out on, and took steps to rectify this. The result has been a line of “Figure-Rise” kits that present anime characters from a wide variety of different shows and games as fully-poseable, fully-injected styrene models, complete with Bandai’s trademark full-colour moulding. However, just before this new wave exploded onto the scene, Bandai went back to its roots…. Gundam Girls.
In the early ‘80s, during Zeta Gundam’s run, it seems, the idea of drawing, and then modelling, “Gundam Girls” first saw the light of day. The concept is simple; take a cute anime girl and dress her (although somewhat revealingly, of course) in armour that resembles a particular mobile suit! The idea caught on, and today’s Megami Device, Frame Arms Girls and 30 Minute Sisters all owe their existence to this idea and the couple of official kits that were released. (I seem to remember reading about what I think were two official Bandai Gundam Girls, but I can’t find the reference online now, so you’ll have to rely on my sketchy memory on that one!)
When Build Fighters Try aired, Bandai decided to test the waters and floated a couple of Gundam Girl kits based on the main female character in the show: Fumina Hoshino. The first was the “Super Fumina” a kit of Fumina in a maid’s costume outfitted with the armour and weapons of her first MS, the Powered GM Cardigan. (Yes… Cardigan… I don’t make this stuff up!) The story behind this kit is a bit convoluted and is really just an excuse for Bandai to issue this kit. It went over well enough that there was a second kit, based on it but heavily reworked, called the “Super Fumina Axis Angel”, which incorporated angel wings and Quebely-based motifs in its design.
Since then, there have been a number of other Gundam Girl kits from the various “Build” series, and over time these have gotten better and better. However, the first two Super Fuminas don’t have a great reputation, and it seems Bandai was feeling its way towards what made for the best type of girl kit. Yes, that sounds creepy, but I can’t help that… As anime figure kits are so hard to find, I jumped at the chance to grab most of the “Build Girls” as they came out. There were a couple I didn’t bother with (the bizarre and somewhat fetishistic Loheng-Rinko kit comes to mind…), but I figured given the price of resin figure kits and statues that these kits could provide fun and different distractions if I got tired of the “same old” MS kits.
Who First?
While looking at my stash a while ago, I decided to pull out a Build Girl to see how they were. I’d heard some rather negative reviews about the first two, as mentioned, so I immediately gravitated towards them. Since I had two Axis Angel versions, I decided to go with that kit. However, just building it “as is” seemed kind of silly.
Then, it dawned on me! It was getting close-ish to Christmas, and I hadn’t done a Christmas Gundam kit since I finished my Gundam Christmas Diorama years ago! Well, that was the clincher, and I decided that the Axis Angel kit could be reworked into a more traditional Christmas Angel for display around the Holiday Season. After all, lots of people have angels as tree toppers, so it’s definitely in the right vein. I don’t intend to stick Fumina on a tree anytime soon, but I figured she might look good as a hearth decoration or something similar. With that idea in mind, I broke open the box and started to get my mind working on the problems at hand. Yes, that’s “problems”, with an “s”…
The Super Fumina Axis Angel Kit:
As with most modern MS kits, I didn’t bother to do an out of box review of this kit. There are plenty of those out there, and I’m sure you don’t need me going on about it for the umpteenth time, never mind that I’d be a few years behind the times. However, there are a few things I did want to mention about the kit that hit me when I first popped open the box.
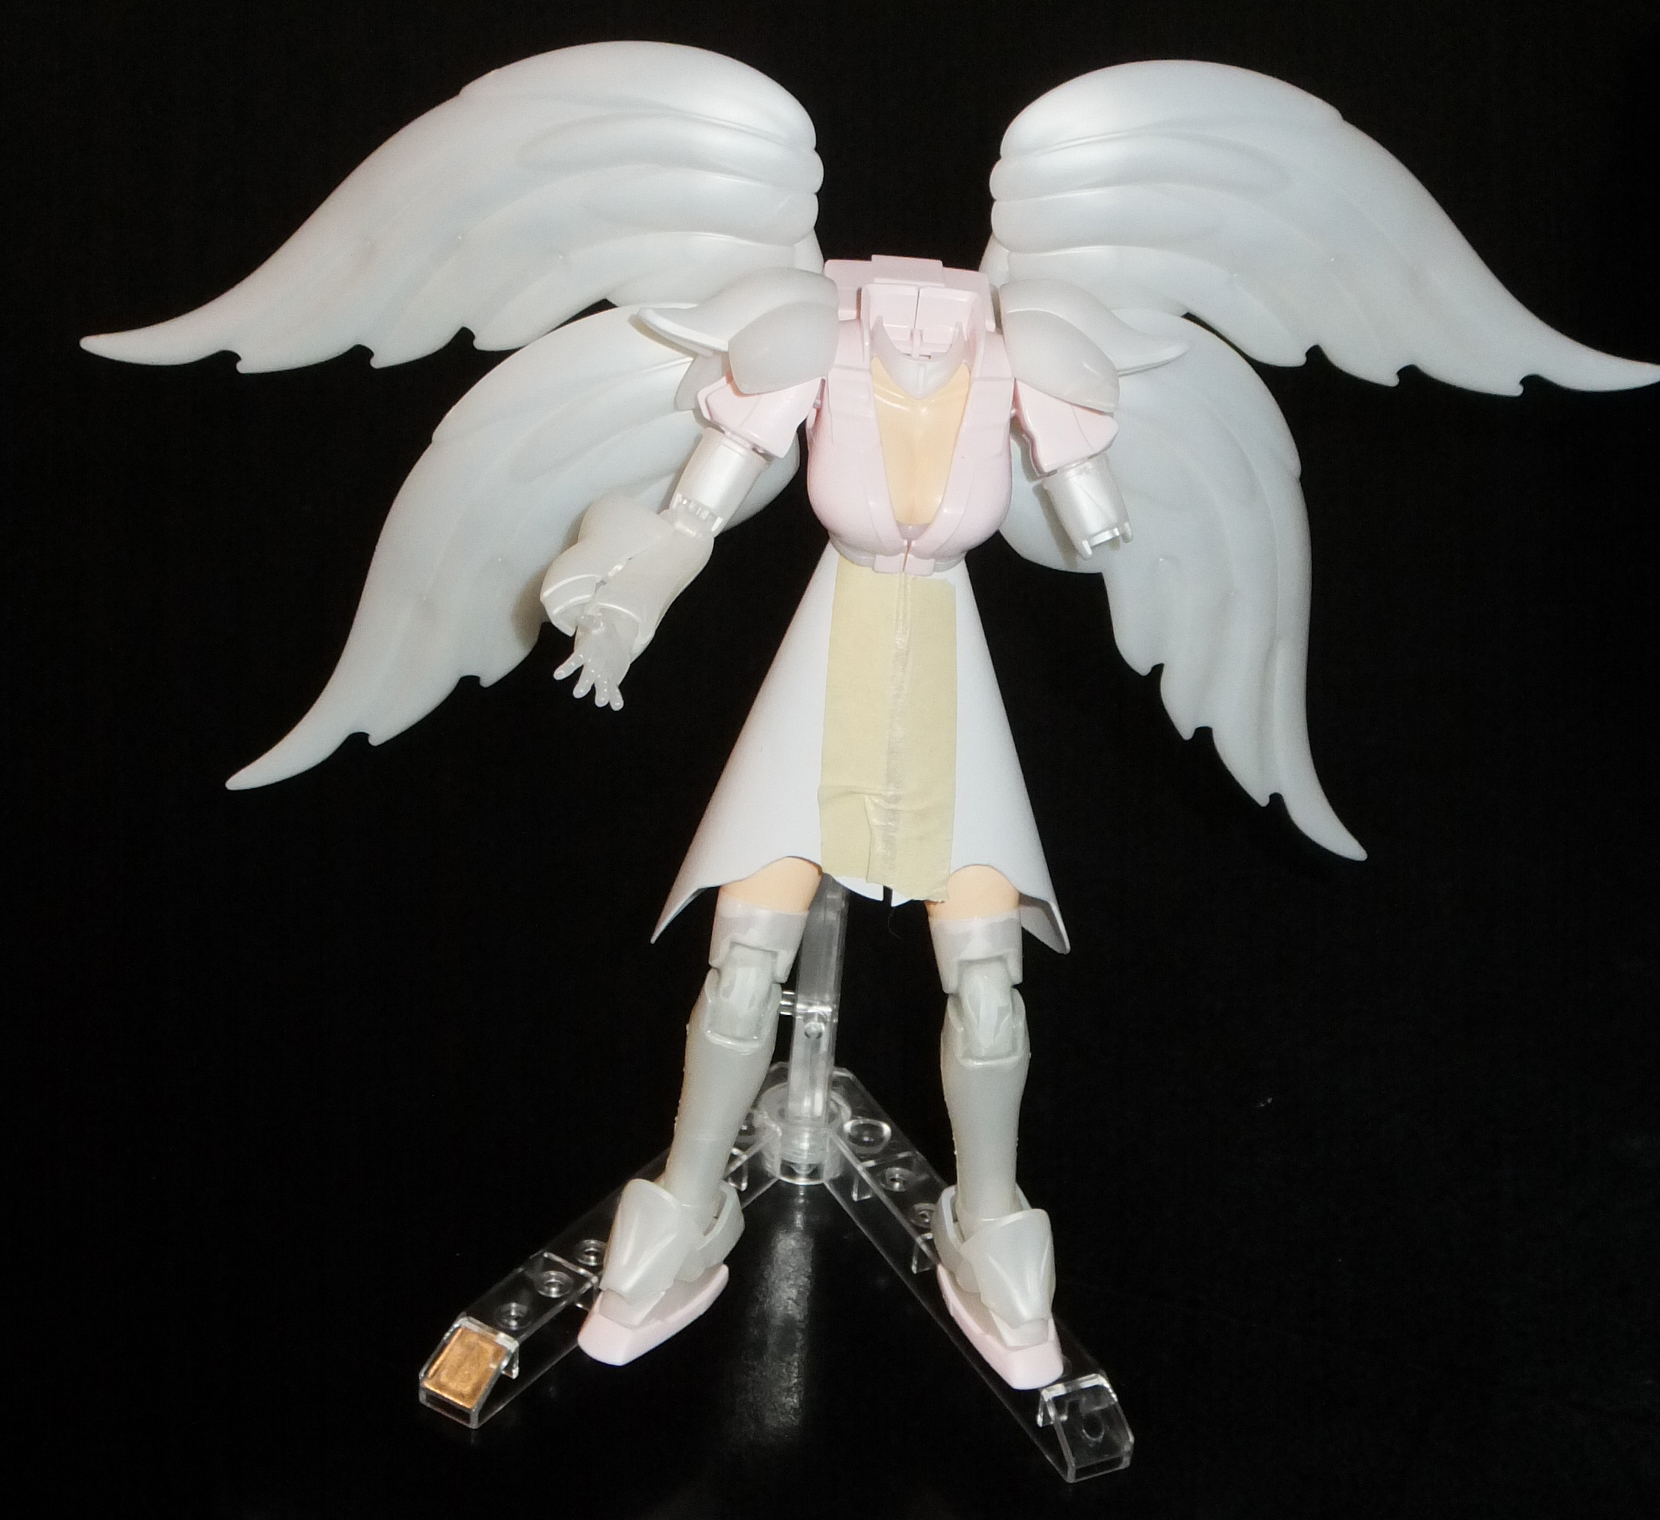
The first thing you see is the box itself, and it’s a beautiful creation in the great Bandai HG tradition. The kit, or figure, or whatever, is illustrated in full “anime cell-style”, and with her wings fully spread she takes up most of the box. Unlike the first Super Fumina kit, this one makes no attempt to avoid showing off the kit’s proportions and “assets”. This Super Fumina sports a decidedly low-cut top and a bare midriff, which is a bit at odds with her covered arms, legs and her angel wings.

When I opened the kit, the first impression I got was “Yum”. Yes, that sounds gross, but the reason was not as lewd as you’re likely thinking. The plastic reminded me of a McDonald’s Strawberry Shake. I loved those as a kid, and haven’t had one in decades. However, I could taste it again just looking at the pastel racks of pink and pearlized white. It was bizarrely calming and it really looked more like a box of fancy candy than a model kit. Still, it was all there; multi-coloured moulding, semi-translucent white polycaps and a sticker sheet with all kinds of different eye variations. It looked like a typical HG kit, and I thought that the negative reactions I’d been hearing were overblown. You can see the kit here: Hobby Search Axis Angel.
The instructions were typical Gundam ones, with a lot of colour in them. The eye placement was a bit convoluted, as the kit has the ability to put the eye stickers either under glass lenses or on top of a moulded “eye” piece. Under the lenses would look weird, I’d think, but choosing which eyes you want is a necessary step before building. The neat thing was that the figure also came with a stand, albeit a small one (not an Action Base-type). Perhaps the weirdest thing was the material for the pink parts of the skirt: Just like the original Super Fumina’s, this has a rubber component. It’s similar to the rubber in the old MG Alex or 1/60 Patlabors. That means it’s trouble… It won’t hold paint and it’s tough to work with properly.
How Are We Playing This?
That’s the question I had to answer before I could go too far. The core issue I have with the new Figure-Rise kits and their ilk is articulation. It’s nice to have a figure that can move and pose. I have lots of 3 ¾” GI Joes from the 80s like that. However, on a toy, seeing an elbow or knee joint is okay. On a model… I have a real issue. I don’t like seeing weird joints on a figure kit. It makes the kit look like a mech, or a weird puppet, rather than a model of a human being.

However, this is where I hit a wall. In-universe, the Super Fumina IS a kit! It’s a model of Fumina Hoshino that was made, without authorization (but with all the creepy stalker-fetish-ness you can find) by Minato Sakai, who is a skilled builder and, uh… “fan” of Fumina. Really, this isn’t a Gundam Girl or a figure kit at all; it’s a real model of a model of a person from a cartoon. (See why this gets difficult if you overthink it?) So, giving this kit Gundam-type joints makes perfect sense.
Still, that’s not what I wanted. I wanted a model of an angel, a humaniform angel that was not a kit or a robot, but a real, skin-covered being. I wanted an anime-girl-angel Christmas ornament, not a replica of a replica of an anime girl. However, to correct the joints would be a big job, and it would negate all the poseability build into the figure at great effort. Regardless, I decided that this was the correct path, so my first job would be to get the kit put together roughly so I could figure out a pose that would work and could be set fixed. The second job would be to putty everything in place and blend it all together.
Posing is a Snap!
I don’t snap kits together. I’m a modeller. That means glue, fill, sand, paint. That’s why I build models, because I love the challenge. However, in this case, it was extremely necessary to snap the kit up totally, so I could gauge clearances, positions, and a feel for what would look “natural”. So, I cut off all the pieces (there aren’t a lot in this kit, compared to other MSs at this price point) and dutifully snapped them together. I found out three things:
- I hated it. Putting together a Gundam without painting and doing a proper job chaffed me. Turns out I’m a modeller after all, and the lure of “quick assembly” will likely always be lost on me. Good. I felt better about that. I’m on the right path, and living my best modelling life (whatever the heck that new-agey gibberish means).
- This kit does suck. I was amazed, but Bandai really did crap the bed on this one. The fit was iffy, the seams pronounced in spots, and it was loose. Nothing wanted to hold in place (great for posing, by the way). The head lolled around, the wrists were wibbledy, the legs and ankles didn’t want to hold all that well and those rubber skirt parts were complete garbage. Oh, the stand is no great shakes either.

- The wings are the best part. The holding arms for the angel wings are very Lego-like in that there are many, many ways to use them. The parts can be retasked and flipped around in a variety of ways, and this was critical. I didn’t like the wings the way they were supposed to work; I wanted to change their arrangement. Thankfully, I could.
Skirting Disaster:
As mentioned, the skirts on this thing are trash. I hope Bandai learned their lesson: Don’t include unpaintable rubber on a Mech Girl kit! However, it wasn’t just the material that sucked. It was the whole setup. I may not be a prude, but I do find the concept of an angel wearing a super-short skirt, bike shorts and baring her midriff to be just wrong. Angels are usually shown in flowing robes, not belly shirts. Thus, something had to be done. After all, I couldn’t just have her wearing only her bike shorts, now could I?
I needed a long, angelic-looking skirt. That means, I needed something I could mould a skirt out of. I thought of Worbla, a flexible plastic material used for Cosplay, and sold at NeoTokyo, our local anime store. It might do the trick, but I didn’t have a hotplate to use it right, and it was very expensive. But then I thought about it… if I used thin-enough styrene sheet, maybe I could roll it around her waist to make a skirt.
Fun fact: I wasn’t really very good at drafting in Engineering School. That’s why I’m an Electrical, not a Mechanical, Engineer. Thus, figuring out a design for the flat shape that would roll into a skirt wasn’t going to happen on its own. I needed a prototype, and paper was the answer! I cut pieces of paper and started sticking them up under her top, and taping them together around her waist. I trimmed and shaped it roughly, and then took the contraption off for tracing. This gave me a new single piece of paper with a very odd shape that I could reliably roll around the figure’s waist and tape in the middle.

This second form was then cut down the middle and re-traced for final contouring. At this point, I added some shape to the back to make it look a bit more “draping” or “flowing’. This then became the master for my thin sheet styrene skirt. So, yes, if you’re asking, I ended up playing dressmaker for a doll. There’s no shame in that.

The problem of course is that even thin styrene isn’t super flexible. To roll the skirt wasn’t going to be easy, but I used heat in my favour. I filled a Tupperware container with boiling water, throwing the skirt in there to heat up and hopefully soften. It did work, and I was able to start bending the skirt into the right shape. This took a while and numerous iterations, but it did work! By the time I was done, I had a styrene skirt that actually fit over the kits’ wasp-waisted midriff and up inside the low-cut top.

Even with the heating, the styrene didn’t want to stay perfectly rolled. I needed a way to hold it together, but there wasn’t enough room inside the skirt to put a locating tab. Thankfully, Fumina’s top has the answer! On the inside of the (rather lascivious) neckline are features that resemble straps, and these continue as some kind of decoration right to the waist. I cut a strip of styrene as wide as these two straps when the meet in the middle, scored a thin line in it, and glued it to the skirt. Because the skirt came to join in the front, this new strip could act as both a continuation of the piping AND a location tab for the two halves. I scored a line down the middle of it, too, so it could bend a bit easier, and would look like it was a continuation of the top’s piping. This was a fantastic success!

Winging It:
I got the body assembled without the skirting. I knew it would have to be replaced, so I focused on the wings before posing the figure. The original design has them folded up like a clamshell, or more likely like the Wing Zero’s backpack binders. This is a neat homage, but it looks dumb for an angel. I’m used to seeing angels with only two wings, but the thought of having one with four was intriguing. I thought that a butterfly pattern, with the upper two pointed more outwards, and the lower two more downwards, might look cool. Turns out, it didn’t, and it would likely interfere with any skirt. So, I went with a more dragonfly-like arrangement.
I completely changed how the wing support arms went together. I attached the wings in different places than was originally specified, and I was ecstatic to find that, after some trial and error, a stable arrangement for the arms could, indeed, be found. Once I had this on the one side, I mirrored it on the other, and then I glued the arms in place, so that they couldn’t lose their position. The best part was that the wings, once attached, completely hid the support arms, and the effect, when viewed from the front, is that the wings are indeed sprouting organically from Fumina’s back.
I hid some of the extra mounting posts with the weird circular adornments that were designed to go in the wing system, and the end effect is something clearly mechanical but oddly medieval looking. I didn’t have to do anything to the wings themselves; they have weird mounting hardpoints on the back for the “funnel stick” weapons the kit came with, but again, these aren’t visible from front-on, so I just left them.

Next Time:
Join me next time as I take a run on those joints, paint this up and get it ready for display this Christmas!
See you then!
