

In the beginning, there was nothing. No rules about form or function, no preconceived notions as to what would work and what wouldn’t. Everything was on the table. And so, all manner of strange forms were to be seen upon the land. And in a profusion of shapes and colours and sounds, did this new breed of creature arise and adapt, changing to suit its world; changing its world to suit it. As their numbers grew, they would see their shapes ever shifting until such time as they crawled, teeming over all the land, taking on a countenance more similar than dissimilar. Then, would the species come be known to its creator by the name it is known today:
The Car.
Despite the expense and relative inconvenience of early car ownership, the car caught on, and as we know, it has been a shaping force for industry and society for over 120 years. However, that shaping goes both ways, and it took a while for cars to get to the point of looking like, well… cars! Many early cars had engines under or behind the seats, were air-cooled and rode on tall buggy wheels with solid tires. They had odd little ugly radiators stuck to the front of them, and flappy belts or chains to transfer power from their sputtery low-RPM engines to the drive wheels. For a while, no one really knew how a car SHOULD look. It was function deciding form. If this sounds odd, it’s because we’ve all grown up in an era when peoples’ expectations and demands on styling have dictated the form of cars. Back in the early days, though, that wasn’t so.
The systeme Panhard, with an engine under a hood (bonnet to the British), a radiator somewhat integrated into the front end and rear-wheel drive was just one design paradigm of early cars. However, its success spawned many imitators, and eventually this layout would dominate the way most cars were made, and the way in which nearly all were styled. This transition was also remarkably quick, with many car manufacturers employing it by the mid 1900s.
The early cars were toys for the rich, like so many new technologies. Racing was a favourite pastime of early motorists, and thus the sporty car was an early edition to the automotive family tree. These large-engined and powerful (relatively speaking), small-bodied cars were little more than a frame with a big engine and a pair of seats with some sheet metal to join it together. However, they soon evolved into a dedicated subtype of car, and one that many aspired to own. Like the supercars of today, early sporty cars like the Stutz Bearcat conveyed a certain message about one’s status and, perhaps unsurprisingly, one’s virility by extension.

But as the twentieth century rolled on, there was a real demand for cars from many of those from other walks of life. Still, the desire for a sporty car and the thrill of the open road beckoned to many. This led to the “runabout”, a sportily-styled two-seater light car that had pretentions to performance but was cheaper and more docile than some of the more outrageous performance machines of the day. They were more practical, too, and they caught on quickly. In many ways, these cars were like the Pontiac Fieros or even EXP/LN7s of their day. They were lightly-built and powerful for their size, but cheap to buy and run.
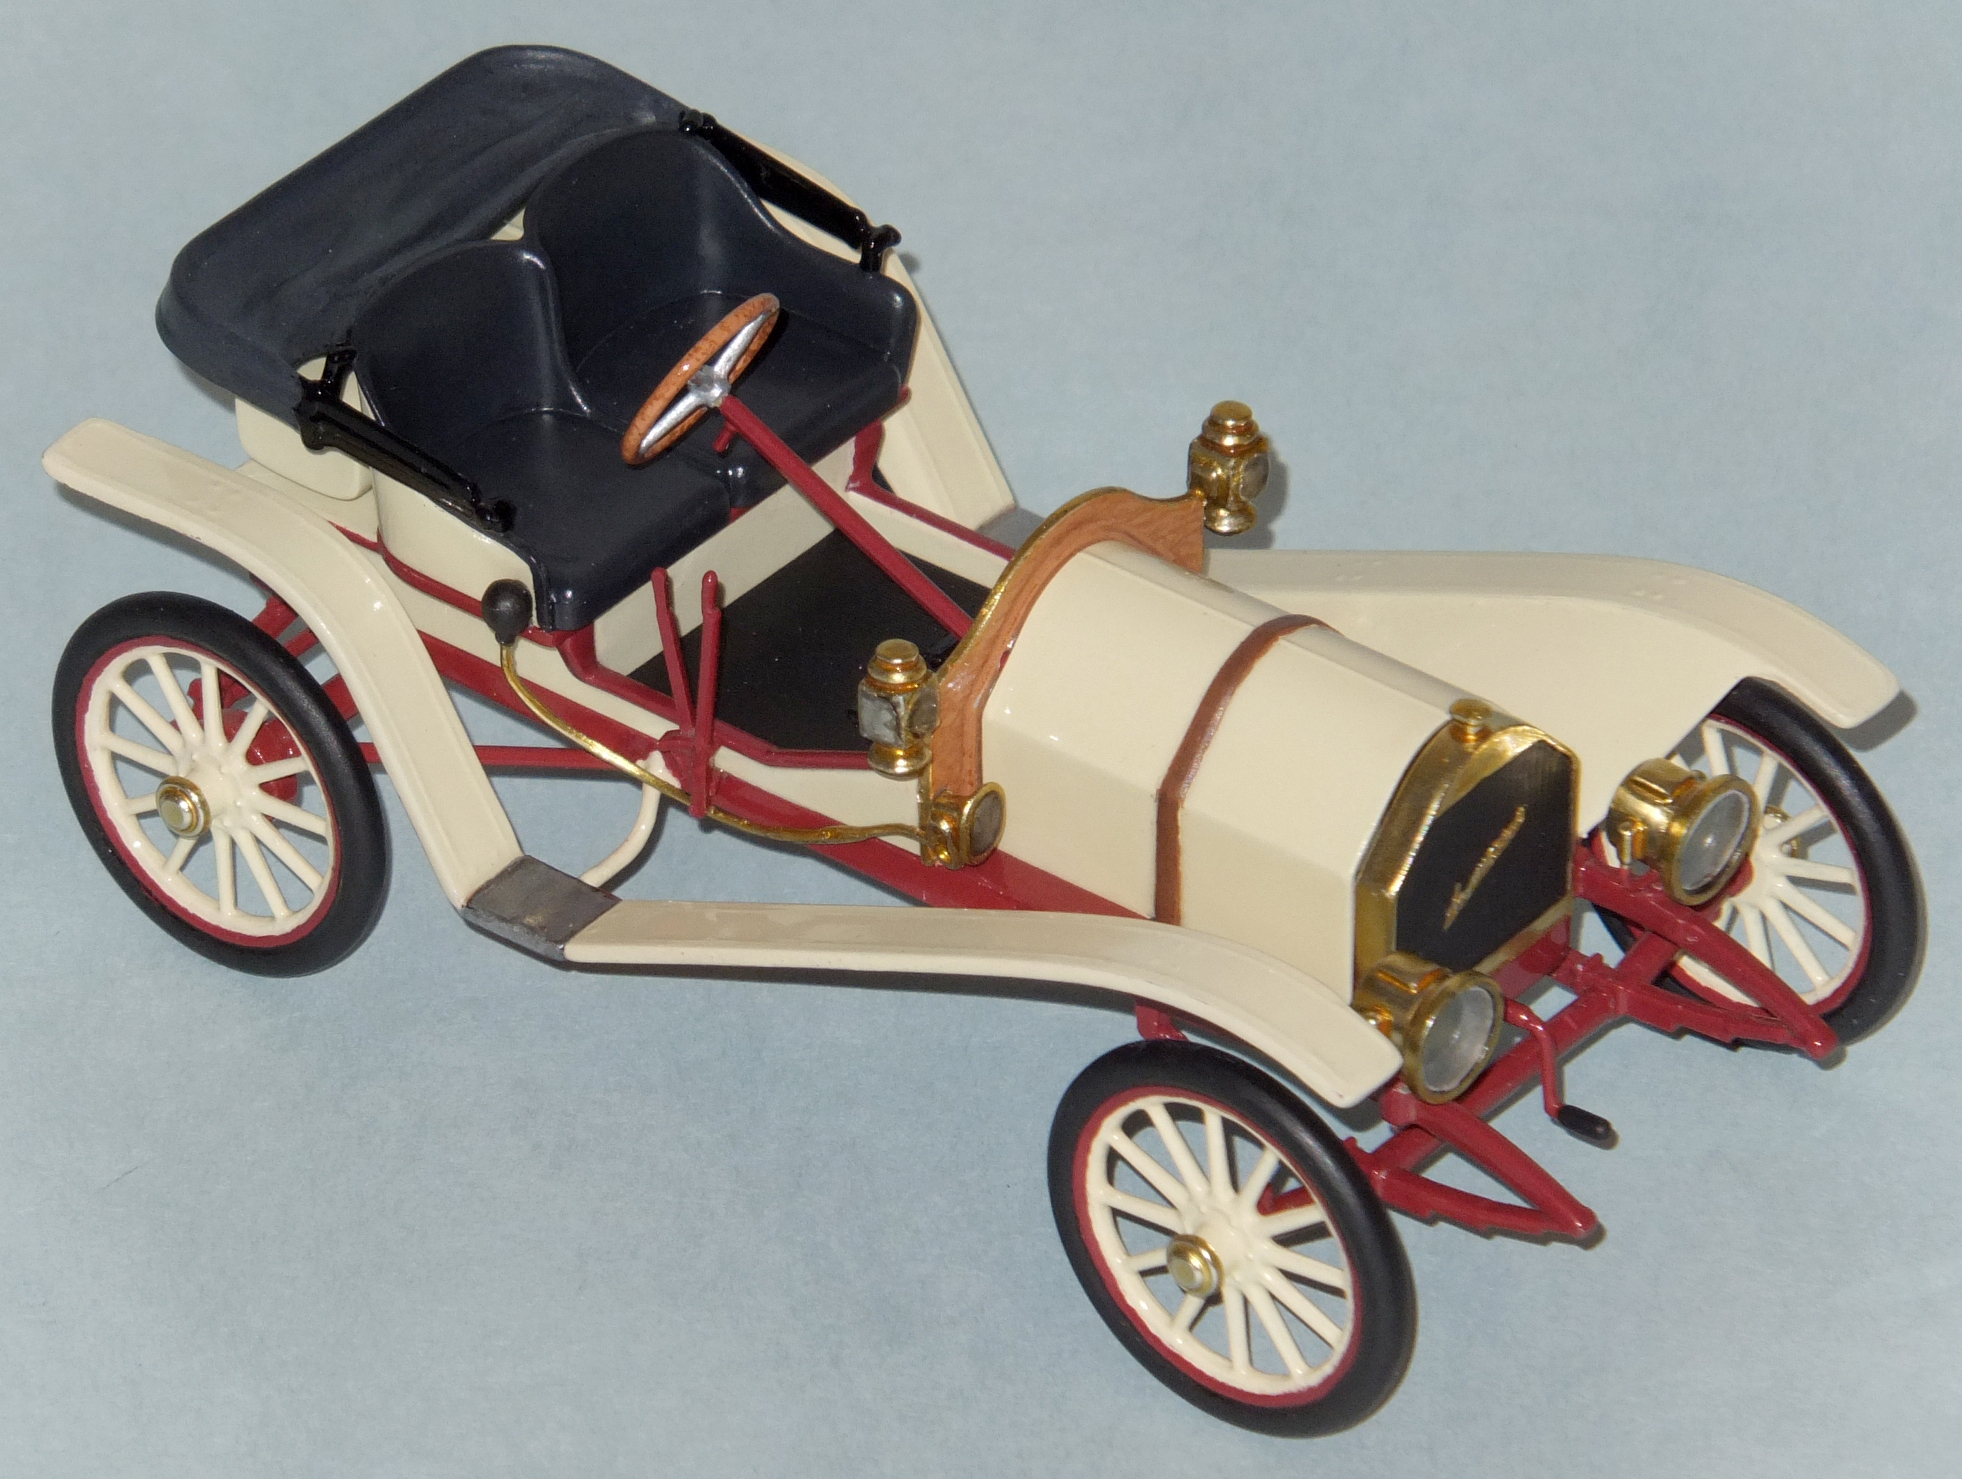
One of the best of its day was the 1909 Hupmobile Model 20. This had all the trademarks of an expensive, sporty car while being much more cost-efficient. They were also built extremely well, and the company even earned praise from Henry Ford himself who was amazed, and a bit jealous, that Hupmobiles were of such a high quality-to-cost ratio. The Hupp Motor Car Company was based in Detroit, and survived until 1939. Sadly, it is now largely forgotten by many, but there are a good number of surviving Hupmobiles today, and those who own and preserve them are a hardy and close-knit breed.

While the Model 20’s success meant that it almost immediately became a classic, this era of car is not one that is particularly well-served by the modelling industry. The “Brass-Era” of cars enjoyed only sparse notice by kit makers, but one of the earliest was, indeed, a Hupmobile 20. This model was made in the (now standard) scale of 1/24, and was produced by Kaysun in the mid ‘50s. What, you don’t know who Kaysun is? Me neither. I’d never heard of them until my friend Alan sent me a big box of awesome, and inside it was the Hawk Models reissue of the Kaysun Model 20. This particular kit comes from 1964, so even though it was already a “Retro Repop”, it’s still over 50 years old!
If you want to see what I started with, you can check out the out of box review here:
Hawk (Kaysun) 1909 Hupmobile Model 20 Runaobut (OOB)
Since I’ve always been a fascinated by early, Brass-Era (BE) cars, the chance to build up a kit such as this was too much to pass up, and I dug into the Hupmobile fairly quickly. I was under the impression that, with such a small number of pieces, and with it being a curbsider, it would be a quick build. Of course, something worth doing is worth doing right, and I found out quickly that this simple-looking kit would require some different skills than I normally use.
Dispelling the Mists of Time:
When I build planes, I try to make sure they’re relatively accurate. Same with tanks. However, on no subject am I more picky about getting factory finishes and details right than I am on cars. Since I so often build the forgotten and misbegotten, the losers of the automotive world, I have to make sure they’re right so that people get a chance to see them. After all, how many Chevette Scooters, Cavaliers and Subaru BRATs do you see nowadays? My goal is to make a museum to the forgotten, and to do it as correctly as possible.
To that end, I usually look up old sales literature and “for sale” ads on the internet, as well as period photos of the cars. Generally, modern pics of restoed cars are not that useful; there’s no guarantee the person doing the resto did it perfectly. Of course, there’s not a lot of stuff on the internet from the early 1900-1920 period. Sales literature wasn’t really a thing, and colour photographs of cars weren’t either. So, I had to go with restored examples to get a feel for colours, colour schemes, two-tone divisions, upholstery and roof colours, etc. This turned out to be a very thorny problem indeed. Why? Because there were almost no two cars that were the same colour, and very few that even shared the same division of colours. Some cars had different headlights, gas tanks and dashboards. Some had more instruments than others, while some had white, and others black, tires.
My main problem had to do with the dashboard. It was always portrayed as polished wood. However, I was worried since that’s how old pickup truck beds are often restored too. Thing is, it’s wrong on the pickups. As I learned while working on my ’64 Fleetside, the beds were always painted black, not nicely polished. So, when I saw that the restored Hupmobiles all seemed to have a polished dashboard/firewall, I got suspicious. I also found a very tattered blue example online, and it had a painted dashboard. However, there’s no way to tell if it was painted originally, or got painted at a later date, maybe a ‘50s restoration? This was a major stumbling block for me. If I couldn’t get this figured out, I’d have to either abandon the project (not really my desire) or pick one, and likely be wrong. I also wanted to know about about acceptable colours, and if the car could be had in any colour. I needed first hand knowledge, but there are no “first hands” left! What’s a poor modeller to do?
Go to the source, of course! And that source was the Hupmobile Owner’s Club. I figured if anyone would know, they would! I emailed the president, Mr. Brian Spear, a long list of questions, and to my great pleasure, he responded with all kinds of great information. While not everyone may have this kit, I want to present the information here for any who do, or any who want to learn a bit more about this interesting and important piece of American automotive history. Here’s what I learned:
- Colour choices in 1909… weren’t. You got a red body with black fenders and white tires. Brian sent me a scan of an original ad; it was as he described it!
- The top was black canvas.
- The seats were black leather and were upholstered both on the seating surfaces and seat backs. On the kit’s box, the seat backs are shown in yellow, the ‘metal colour’ of the car. That’s wrong.
- The engine and transmission were grey. (I assume that included the flywheel/fan, but that’s on me…)
- Headlights were optional in 1909. They were short (like on this kit) in 1909 and 1910, but were taller, with a cross-support bar, thereafter.
- The floor was wood, with black rubber matting attached.
- The dash was made of mahogany in 1909, they went to a walnut veneered plywood thereafter.
- The rad cap on the model includes a “motometer”, which was an early engine temperature gauge. These weren’t available until 1912, and then as aftermarket accessories.
- The steering wheel was wood.
- The gas tank is correct for a 1909. So many Hupmobiles are seen with a vertically-mounted, oval cross section tank. This is a legit form factor, but not in 1909. The ‘09s had the “rounded rectangle” of the kit.
- The 1909 cars have 12 spokes in their wheels, but all other years have 10 slightly beefier ones.
- It is felt that the dash is polished wood, as there would be no reason to paint over the mahogany.
This info was a massive help. I will admit I still was, and to this day am, a bit undecided on the dashboard thing. The reason is that the ad Brian sent me seems to show the original Hupmobile with a red dash. Of course, it also shows a red transmission, a different horn and no brass strap across the top of the dashboard, as well as brass shift levers which were wrong – they should be black. Oh, it shows a black steering wheel, too. So, it’s nice to know that at no time in history have car companies actually had literature that foolproofedly depicts their products. Sigh…
A Pain-t-ful Problem:
Armed with this knowledge, I decided to do the dash in polished wood. However, I was still confused about the paint. Why were there so man paint schemes on a car that only came one way? I had a colour scheme in mind (an off-white and deep red two tone, based on one I’d seen online), but I didn’t want to build the car wrong. I wanted to do the car justice, but also really, really liked my colour scheme. With factory-custom paintwork going out the window as a theory, I turned to Brian for help once again.
As it turns out, unlike in some other circles, redoing a car in whatever scheme you want seems to be acceptable in Hupmobile circles. Maybe that’s true of all Brass Era vehicles? It seems like so long as you love your car, you’re not judged on how you decide to colour it or where you split any two-toning up! What a great attitude! It’s so unlike most car, and model, enthusiast organizations, where absolute obedience to authenticity is demanded. In fact, it gave me pause, because I wanted to do it wrong, and was being told that that was okay.
So, I took the opportunity and ran with it. As you have already seen, I decided on an off-white with maroonish-red two-tone. The off-white is “Aged White”, an Model Master Acrylic (MMA) sold with other train colours in my local shop. The maroon is MMA “British Crimson”.

Before painting, I did rescribe the under-fender hangers, so there would be a clearer demarcation between these and the fenders when it was time for detail painting. I love the “top body”- coloured hangers, and I wanted them to be well-defined when it came time for hand painting them. I did the same on the wheels/tires, in order to try and make painting them a bit easier.
Painting this kit was straightforward; everything was hosed down with Rustoleum Grey Primer, decanted to shoot through my airbrush. Then, the Aged White was sprayed on where appropriate. This was on the seats, box body, fender tops, gas tank and hood. Once try, I masked the tops of the fenders, and painted the rest of the frame and fender undersides with the British Crimson. I used the Crimson on the panel between the seats and box body, drive line and crank, as well as the panel below the radiator shell. I also used it on the steering column. I applied the Crimson trim to the box body and sides by hand; I wasn’t about to mask all that! I hosed the tires in Rustoleum black for primer, and then hand painted the Aged White spokes. I loved the two-colour rims on the car I was emulating; whitish in the middle, red on the outside.
Minimal Assembly:
Unlike most car kits, the Hupmobile is EXTREMELY modular. In fact, it’s even more modular than a Gundam! I’m used to having to complete massive subassemblies (chassis, body, interior) and then fight it all together at once. However, that’s not really the way things work here. The reason is that almost all the parts can be completed separately, and then just brought together at the end, like some kind of crazy Lego set.

There was also very little need for filler. Modern kits of all kinds have recently discovered that breaking models up along panel lines is very helpful and it’s slowly becoming the norm. Amazingly, Kaysun knew it and did it in the ‘50s! Nice of the rest of them to catch up finally, eh? Since this kit is split along seam lines, or at least along sensible divisions, there’s really very little that requires gluing ahead of time. The only things I actually did assemble before painting were:
- The front suspension; glued it (with the main axle) to the front end of the car.
- Rear suspension; glued it to the differential and driveline piece.
- Firewall; glued this to the box body’s two extending “sides” or sills.
There was some filling and sanding required, mind you not as much as you might expect. The biggest offenders were the dashboard-mounted carriage lights. These had sink marks in a couple of places, including the backs and the front lenses. Another big issue is the gas tank. While it’s difficult to see under it, you technically can. Were you to look, you’d see that the tank is hollow. That’s not cool, especially on a kit where, save for the lack of engine, almost everything else is nicely rendered.

I used Crayola Model Magic to fill the majority of the tank. This material is light and highly resistant to shrinking. When it was dry (overnight is enough), I applied a layer of CA over top of it, and a thick layer of Model Master Acrylic (MMA) Flat White over that to act as both a hole-filler and hold-detector. Once sanded down, the bottom of the tank looked solid. It may not be perfect, but it’ll do, and it helps make the rest of the model not look like a toy. I used the same approach on the underside of the Acetylene Generator, which was also hollow.

Sadly, some parts are very delicate and the horn is among the largest of these. With its long, thin tube, I used a razor saw to cut it off the rack. Even then, with a razor saw, I still ended up having the horn tube break. I used liquified styrene to add a patch and get it back together. Sanding that down was interesting, and while I got it close, I never could get it quite as thin as the rest of the tube. Still, it doesn’t show up much, and it’s not like I could leave the horn off! One thing with BE cars – they need their “aoogah” horns!

Touch Wood:
Since I was going to do the firewall in polished wood, I had to figure out how to actually simulate such a material. In my paint drawers, I found an orangey-brown that I think I might have used for wood, or seat striping (?) on Gold Rush. It was a weird colour, but it did match what the dashboards looked like. It was a tiny bit too orange, but it did match the veneer on my worktable! To simulate the wood, I painted the underside of the floor pan (the topside was done in MMA Aircraft Interior Black). When it was dry and sanded smooth, I used a medium brown Prismacolor coloured pencil from a set my grandfather had given me when I was a kid to literally scribble on the grain pattern. I made some horizontal-ish lines, and then did some bumps and whorls, to be like knots. Once I glossed it, I was amazed at how close to my table’s veneer it was, and how much it resembled the wood seen in the polished dashboards!

I did the dashboard in this same fashion; paint then pencil grayon. Again, it worked fabulously. I repeated this on the panel behind the floorboard (under the box body) that was moulded into the chassis. I wish that this had been a separate piece; it would have made painting and touching up far easier! The last place I needed wood was the steering wheel, and again, the effect worked really well. I will admit, I am very pleased at how well the wood grain effect works, and I’m very happy that what I thought would be a major obstacle was cleared relatively easily!


A Kick in the Brass:
On a lot of early cars, brass was used for brightwork, not chrome, which came around a bit later. Radiator shells, lights, horns and other details were often brass. When polished, a BE car looks like very little else; the brass looks old-fashioned but dressy at the same time; like a stylish suit that, while out of date, clearly once had the best of intentions behind it.
The problem with brass, sadly, is this: there’s no paint for it. Unlike for Chrome and other polished, natural metals, there doesn’t seem to be a “Polished Brass” paint. There are many “brass” paints, but these are usually metallic, and are nowhere near like what you see on a BE car. They’re fine for ships’ screws and the like, but they would look silly on a radiator shell. Since the Brass is more or less the entire point of the model, this lack of suitable painting agent is not something you can just shrug off. Before I could even start the car, I had to have a way to simulate the brass. No brass, no model.
I had hoped there might be a “bright brass” bare metal foil, but I couldn’t find any. Gold foil is too brown to do the job, and besides, some of the parts are too small and fragile to be covered with foil. The horn is a perfect example, and the lights are too detailed for this to work easily. Since even Alclad doesn’t seem to make its “Polished Brass” anymore, I was stuck. Then, I thought about it. I didn’t need a polished brass paint, if I could cheat chrome into thinking it was Brass!
In the past, I’ve noticed that when I mix pigments and Future, the colour of the pigment dissolves into the Future and the metallic bits settle. That’s why my metallic paints require constant shaking. I tried that approach here, but it didn’t work well. I couldn’t get enough yellow in the Future to do the job. Then, I remembered how I made the gold I used on Gundams, like the MG Shenlong. There, I used yellow pigment, and yellow food colouring to boost MMA Brass. (Note, MMA brass is the “wrong kind” of metallic brass, and thus not a solution to my problem, sadly…)
So, I started again, but this time I used Aqua Gloss as the base, since it is the one clear coat that doesn’t totally dull Molotow Chrome when applied. I used Molotow Chrome on a test piece, and then airbrushed on my “Brass Coat”.
Aaaand… Fail. Utter failure was the result, with the Molotow going supremely dull, the yellow looking like it was applied over grey, and there being patches of milky whiteness that wouldn’t go away. I didn’t get it. I can, and have, applied Aqua Gloss over Molotow chrome before, and only gotten a light dulling. I tried the same with Future, but it was just as bad. I was so sure I had the answer; after all, I think coloured chrome pieces are just a colour tint applied over chrome, so why was my approach not working? Despondent, I turned to the internet for help.
I found someone who was big time into Star Wars, and had made a beautiful C-3P0 costume; it was goldy-brass and very shiny. I watched his video, and was amazed to see he did exactly what I did. Food colouring and Aqua Gloss were how he created C-3P0’s characteristic golden body. “Well crud… So, what did I get wrong??” I asked myself, rather peevishly. The answer, it seems, was the airbrush! Later in his video, he mentioned that when he airbrushed his topcoat, it looked terrible. He then went to a 1” brush and when he brushed it on, it worked. Many thin, hand-applied coats later and he was done.
Encouraged, I tried it, but with a much smaller brush, on another test piece. After about 5 coats, I could see that I was getting what I wanted. I tinted the brass coat a bit more orange, to match some pictures I had, and when I was done, I was amazed! It wasn’t perfect; not as gleaming as the chrome underneath, but far, far better than anything else I’d tried. Thus, I used Molotow Chrome to airbrush all the brass bits on the car, except for the carriage lights on the dash. These, I would have to hand paint, since masking them was going to be impossible.

I took some Molotow Chrome, thinned it with 99% Isopropyl Alcohol, and found that you can very easily paint a layer of chrome as easily as airbrushing it. The key is to thin the paint just enough that it flows, without puddling or tearing. It’s a feel thing – use test pieces first! Once I had the lights done, I thought I was good to go. BUT WAIT! I had missed something – the top of the dashboard always seems to be done in polished brass – no doubt a brass end cap was put over the dash to make it look better and prevent the wood from splitting at the edges. To simulate this, I laid down a strip of Bare Metal Foil all the way along the top ridge of the firewall and down the sides.

Then, I brassed it all. After 15 or so coats over multiple days (more like a week or so, I think), I found that the once-chromed pieces now did, indeed, look like bright brass. It wasn’t as shiny as it could be – it never is when you gloss Molotow, but the result was pretty awesome. I put on a final (no, not really, but I thought it would be) coat of clear Aqua Gloss to seal it all in. What happened next was only partially surprising; I pulled some of the colour out of the brass work. Since food colouring is water-soluble (even when dry), and this is AQUA Gloss, I wasn’t totally unprepared for this. So, I brassed the affected pieces a few more times, and then just let them be.
As for the radiator, I painted the centre with MMA Aircraft Interior Black, being SUPER CAREFUL to try and keep the centre script visible and shiny. That wasn’t easy.
A Lighter Task:
The lights on BE cars were largely not electric, especially at the time when the Hupmobile was first produced. Lights ran on Acetylene (like welding torches), and that’s what the tank on the passenger side is for. However, because it was a literal flame inside the headlight shell, the insides of lights on BE cars are often darkish, a bit soot- and heat-stained. I wanted to replicate this, so I didn’t brass the inside of the headlight, but instead gave it a fairly thin wash of Citadel’s Nuln Oil. This served to darken it perfectly, but something was missing… Oh yeah! Glass!
Because there are no clear parts in the kit, there are no headlight lenses. They could have moulded them into the headlight, but they didn’t want to lose the all-important depth of the headlight, another BE trademark. So, I just made my own! I had some very thin (0.010”) clear styrene sheets from another (as yet unbuilt) project, so I used a small Crayola shape template to cut circles almost the same size as the headlights. I then carefully sanded them down so they’d sit just inside the rim of the lights. I wanted them to rest on the housing at the inflection point where it changed angle to come down the “bell” of the headlight. This was a slow process, but I got it to work just right, and I used thinned out Tacky Glue to hold the lenses in place.

The other lenses on the car, those on the carriage lights and the tail lantern, were done using Bare Metal Foil. I got the “sooty” look on the carriage lights by giving them a wash of Tamiya Smoke (seems appropriate) and used Clear Blue and Clear Red on the tail lantern. I’ve found you can’t just apply Tamiya clear acrylics over bare or even Aqua Glossed Molotow; it just eats through the chrome and turns it grey. That’s where the foil comes in, as it stays nice and shiny the whole time.

Material Concerns:
As mentioned earlier, the upholstery in the early Hupmobiles was black leather. Before painting, I rescribed the scalloping around the tops of the seats – this would have been fabric wraparound. Unlike on the box, I painted both the seating surfaces and the backs usingVirsago Black (a black-grey I custom mix). I didn’t want the seats to look like the tires and floor mats, after all. I then carefully flat coated the black area of the seats, and applied two coats of my “hand vinyl” semi-gloss coat. The result is a slick-looking, but not shiny, finish. Perfect for leather!
The convertible top (more like a hood, really) was moulded folded down, and it was also painted in Virsago Black. I used some black pastels to highlight some details, but this time I kept it to a “low satin” finish, like one would see on heavy cloth. This helps to make it look different from the seats even though the top is right behind them. I also painted the exposed parts of the support arms in gloss black, since they’d be painted metal.
I didn’t have to touch the surface of the floor; a new jar of Aircraft Interior Black looks just like rubber when applied carefully. The same thing for the tires, then, by extension, produced remarkably realistic results despite the fact they’re only really styrene.
Final Steps:
Obviously, the model was given many coats of Aqua Gloss, like all my cars, and sanded and polished to be as shiny as possible. I used 4000 grade sanding cloth and then Tamiya Fine and Finish rubbing compounds. Novus 1 plastic polish was used as the final step, and as always it really brought out the shine on the paintwork. I didn’t bother sanding the brass, it was too risky and it looked fine as it was. The leather strap on the hood was the last thing I painted and I used MMA Leather, appropriately enough. I gave it a light Devlan Mud wash to add some character to it, and the effect is subtle but nice.
All, then, that was left was final assembly. This went rather smoothly; the only problem was that this kit’s precision was SO high that the painted parts didn’t all fit into place without scraping or forcing. This is what I expect from a 2015+ Bandai, not a repop of a ‘50s kit! The only other kit I’ve built of this age of moulding is the Seamaster, and man, that thing was junk. This is a pinnacle of fit that I have yet to see equalled in any American car kit. Well done, Kaysun. Well done.

The kit literally fell together, with all the pieces just going where they needed to. I had to use some CA to hold on the horn, the radiator and the hood. I can’t give enough praise, or express enough surprise, at how painless final assembly was; it is not my experience in car building that this stage is ever enjoyable. This time, it was, and little by little the Hupmobile took shape with the addition of each successive piece.

The last things I put on were the little brass hubcaps, and they really helped to set the whole thing off. While the colour was a bit more yellow than I’d originally envisioned, I think it looks great, and man, this thing is a scream to see on a shelf!
Conclusions:
The Brass Era of cars is long gone, and will never return. It marked the transition of the car from a toy to a practical piece of daily equipment, and saw the rise of a number of different form factors, some of which are still to be found today. The 1909 Hupmobile was a small, two-seater with sporting looks and decent performance for its time. Its high quality of manufacture has ensured that numerous Hupmobile Model 20s still grace our streets and museums with their presence, and lead to Kaysun kitting the car for all to enjoy.
This kit is awesome. It may not look like much with its weird yellow plastic and low part count, but it hides a deceptively detailed kit that gets it almost all right. “Why only almost?” you ask? There’s no engine (it’s a curbsider kit), which is fine, but there’s also no exhaust. That’s the one thing missing that’s fairly obvious. Other than that, the kit accurately reproduces the 1909 Hupmobile to a high degree of fidelity. From the right shape of gas tank to the right number of spokes and through the short headlights and the correct rad cap (once you take the Motometer off), Kaysun did a bang-up job with this one.

That being said, and despite the excellent fit of all the parts, this can’t be a kit for beginners. The only reason is its rarity and cost. If this were to be reissued, it would be PERFECT for newer modellers. There are only a few parts, most are fairly robust (save the horn) and final assembly is the textbook example to all other model companies. It was a great car to cut my Brass Era teeth on, since I could worry about the peculiarities of the wood and brass and not worry about if it would actually go together or not.
I thoroughly enjoyed building this kit. I love the paint choice I made, and I think the kit lights up any shelf it is put on. With distinctive style and that shine of brass, it oozes heritage and a grace of times long forgotten. What amazed me is how small it was. Up against other 1/24 cars, it looks tiny! Still, its distinctive ride height and lack of roof really sets it apart from almost anything else. Surely, as of right now, it’s unique in my display.
I wanted to build this for a lot of reasons. Alan, who sent it to me, said it had been a grail kit of his, and I wanted to do it justice. I wanted to pay tribute to those pioneering souls from the early days of American motoring, as well as to those intrepid owners who preserve, maintain and drive the real Hupmobiles of the world. Keeping a 110+ year old car is not easy, nor for the faint of heart. However, it is a labour of love, and I hope that my build will help to interest even more people in learning about cars of this era.
I’ve always been interested in Brass Era cars, and never more than after having built this little guy. If you like something different, and you want to celebrate the pioneers of American motoring then grab one, or any Brass Era kit, whenever you find one. I think you’ll find the experience is very exciting and enriching.
